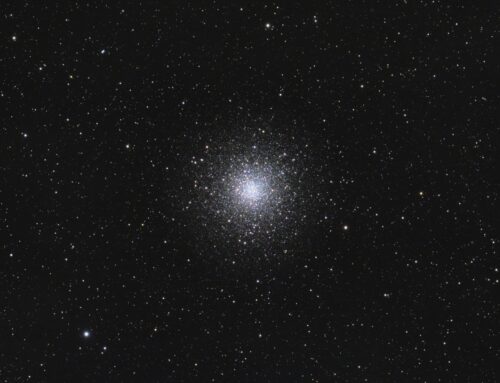
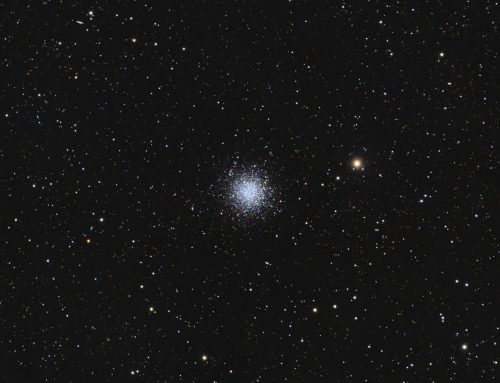
Globular Cluster M3

Click image for full size version
May 26, 2019
The last time that I imaged M3 was in May 2012, so I thought it was time for an update with the nice Esprit 150 refractor that I am using. Unlike some other objects in the Messier catalogue, this object was actually discovered by Messier, in 1764. It is one of the largest globulars, containing about half a million stars, and it lies about 34,000 light years away and measures about 180 light years across. Are you feeling old today? Consider that the estimated age of this cluster is more than 8 billion years! Then go celebrate your relative youth, no matter how old you are! If you have binoculars, you can see this object easily in a moderately dark sky as a hazy patch. Larger and larger scopes reveal more detail towards the core, and fainter stars around the outside.
Look carefully and you can also see many galaxies throughout the field. Perhaps the most obvious is below and to the right of the brightest star in this image, in M3’s outer regions.
Tekkies:
Sky-Watcher Esprit 150 f/7 refractor, QHY 16200-A camera, Optolong Ha, L, R, G and B filters, Paramount MX, QHY5-III-290 guide camera with OAG. Acquisition, guiding and focusing with TheSkyX. Automation with CCDCommander. All pre-processing and processing in PixInsight. Acquired from my SkyShed in Guelph. No Moon, average to above average transparency and average seeing. Data acquired March 25 – May 8, 2019.
40x10m L, 20x5m L, 15x5m R, 14x5m G and 14x5m B (Total = 12hr10m)
Image scale 1.15 arcsec per pixel
Data Reduction and Cleanup
The BatchPreProcessing script was used to perform calibration, cosmetic correction and registration of all frames. LocalNormalization was applied to the R,G and B frames to correct some uneven illumination due to moonlight. ImageIntegration was used to make the L, R, G and B masters. DynamicCrop was used to crop all the masters identically. DynamicBackgroundExtraction was applied to each master twice, with Division followed by Subtraction. HDRComposition was used to blend the long and short luminance masters into an HDR luminance master, referred to as HDR below.
RGB
Creation and cleanup: The R, G and B were combined to make an RGB image which was colour balanced with PhotometricColorCalibration.
Linear Noise Reduction: MultiscaleLinearTransform was used to reduce noise in the RGB image. Layer settings for threshold and strength: Layer 1: 4.0 0.8 Layer 2: 3, 0.7 Layer 3: 2., 0.6 Layer 4: 1.0, 0.2 Layer 5: 0.5, 0.1.
Stretching: HistogramTransformation was applied to make a pleasing, bright image, with background set to an intensity of approximately 0.08.
SuperLuminance
SuperLuminance: A synthetic luminance was made by combining the HDR, R, G and B masters (weighted average in ImageIntegration).
Deconvolution: A star mask was made to use as a Local Deringing Support image. A copy of the SuperL image was stretched to use as a range mask. Deconvolution was applied (10 iterations, regularized Richardson-Lucy, external PSF made using DynamicPSF with about 30 stars).
Linear Noise Reduction: MultiscaleLinearTransform was used to reduce noise in the background areas, using an internal mask to protect bright structures. Layer settings for threshold and strength: Layer 1: 3.0 0.9 Layer 2: 2.0, 0.75 Layer 3: 1.0, 0.6 Layer 4: 0.5, 0.2.
Stretching: HistogramTransformation was applied to make a pleasing, bright image, with background set to an intensity of approximately 0.08.
Combining SuperLuminance and RGB
LRGB Combination: The SuperL was applied to the RGB image using LRGBCombine with default settings.
Additional Processing
Nonlinear Noise Reduction: TGVDenoise was used in L*a*b* mode to reduce noise with a mask used to mainly target the background areas and protect the stars (max. 1000 iterations and convergence selected for both lightness and chrominance).
Dynamic Range Compression: HDRMultiscaleTransform (6 layers, to lightness, lightness mask) was applied to a clone of the image using a mask to target the core of the globular cluster. The compressed image and original were blended 1:2 using PixelMath with rescaling.
Sharpening: MultiscaleLinearTransform targeting the lightness channel was used to sharpen Layers 2 and 3 with strengths of 0.03 for both. A mask was used to limit sharpening to the core of the cluster.
Final Steps: Background, cluster and star brightness, contrast and saturation were adjusted in several iterations using CurvesTransformation with masks as required.
Very nicely done, I cannot seam to get my stars as tight, yours are always so beautiful.