The Dark Shark
 Click image for full size version (14 MB FILE!)
August 4, 2025
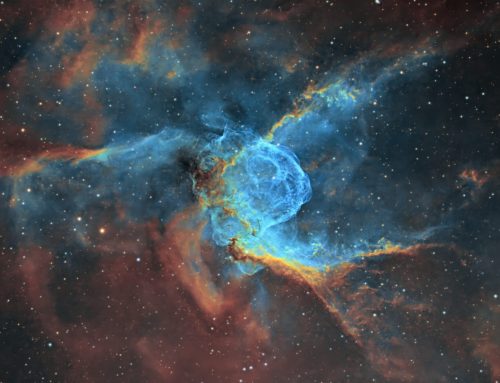
This image shows the Dark Shark, a complex of several objects in Cepheus, located around 650 light years from us, and about 15 light years from snout to tail. The brownish portion is part of a large molecular cloud thought to be glowing dust powered by high-energy starlight. LDN 1235 is the dark spot in the shark’s head. vdB 149 and 150 are the two blue reflection nebulae at the top and bottom of the shark’s neck. Little spiral galaxy PGC67671 appears to sit behind the dorsal fin, but it is far in the background at around 58 million light years distance. Several other galaxies grace the field; I prepared an annotated image that identifies their locations.
This is one of the first imaghes acquired with the Sky-Watcher Esprit 70 EDX. Unlike the Esprit 80mm, this scope has an image circle that can cover a full-frame 35 mm sensor with pinpoint stars. The field of view is a whopping 4.5 x 3 degrees. Focus was stable over a 3 C temperature range (I focused only once, manually, at the start of a 4-hour imaging run). They will hopefully be available to buy later in 2025.

Tekkies:
Acquisition, focusing, and control of Paramount MX mount and other equipment with N.I.N.A. and TheSkyX. Unguided, manual focus. Equipment control with Primalucelab Eagle 4 Pro computer. All pre-processing and processing in PixInsight. Acquired from my SkyShed in Guelph. Acquired under average transparency and seeing and a first-quarter Moon on the night of July 23 – 30, 2025.
Sky-Watcher Esprit 70 EDX refractor, QHY367C Pro camera with Optolong L-Quad Enhance filter.
287 x 5m = 23hr 55m
Preprocessing: The WeightedBatchPreProcessing script was used to perform calibration, cosmetic correction, debayering, weighting, registration, integration and Drizzle integration of all frames (2x drizzle, 1.0 Drop Shrink, Gaussian kernel).
Gradient Removal: SprectrophotometricFluxCalibration was applied followed by MultiscaleGradientCorrection and DBE.
Colour Calibration: BlurXterminator was applied to the RGB master with Correct Only selected, followed by SpectrophotometricColorCalibration.
Deconvolution: BlurXterminator was applied to the RGB master with Automatic psf , star sharpening set to 0.5, and non-stellar set to 0.9.
Linear Noise Reduction: NoiseXterminator was applied with settings Amount=0.9 and Iterations=4.
Stretching: HistogramTransformation was applied to make a pleasing image with background approximately 0.1.
Nonlinear Processing
Star Removal: StarXterminator was used to remove the stars from the master, with default settings, except Large Overlap was selected and halos were decreased by 10% (0.1). The stars-only image was retained.
Nonlinear Noise Reduction: NoiseXterminator was applied to the starless image with Amount=0.9 and Iterations = 4
Re-stretch: HistogramTransformation was used to boost contrast in the starless image by moving the dark point to the toe of the histogram and slightly decreasing the mid-point slider.
Contrast Enhancement: LocalHistogramEqualization was applied twice. A Contrast Limit of 1.5 and 1 iteration was used for each LHE application (scale 50, strength 0.25; scale 300, strength 0.18).
Sharpening: MultiscaleMedianTransform was applied. (Layers 2 – 4 with strengths of 0.01 0.02, and 0.02 respectively).
Contrast, Brightness and Colour: Brightness, contrast, hue, and saturation were adjusted in several iterations using CurvesTransformation.
Stars-only steps: The CIE L* channel (i.e. the lightness channel) was extracted from the stars-only image and then applied to the star image as a mask. CurvesTransformation’s Saturation slider was used to boost colour in the stars.
Star Restoration: The PixelMath expression combine(starless, stars, op_screen()) was used to combine the starless starless image with the stars-only image. The StarReduction script was applied with small star protection enabled (Tranfer method, strength 0.4) to slightly reduce the larger stars.
Final Steps: Background, nebula, and star brightness, contrast, and saturation were adjusted in several iterations using CurvesTransformation with masks as required. ICCProfileTransformation (sRGB IEC61966-2.1; Relative Colorimetric with black point compensation) was applied prior to saving as a jpg. The finder chart was made using the FindingChart process. The annotated image was made with the AnnotateImage script.


absolutely stunning image
Thank you Dawn!
Excellent work, as always Ron! I am constrained to primarily shooting NE-N-NW from my backyard, and even though I am in Bortle 7 you have inspired me to point one of my scopes at the Dark Shark over the next few nights. The processing will be a learning curve for me as I struggle to bring out the brownish dust clouds.