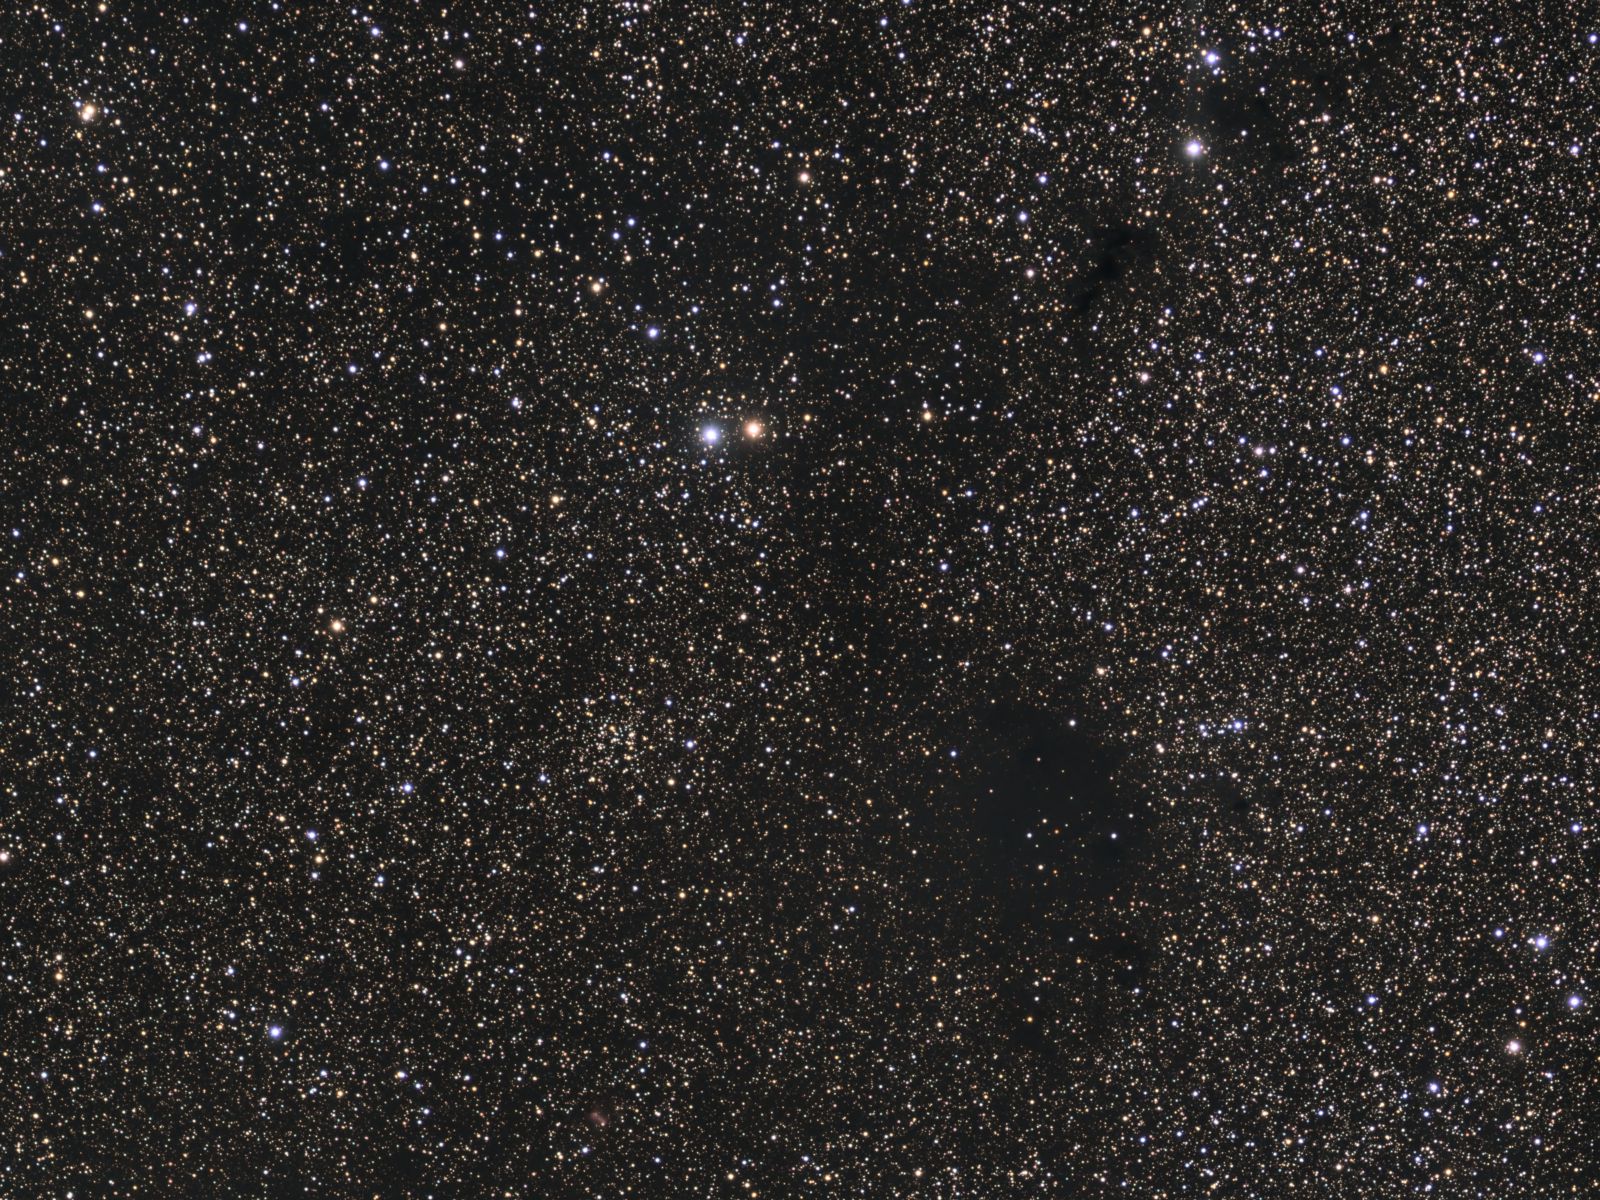
Barnard 361 and IC 1369
 Click image for full size version
July 9, 2020
The open cluster left of centre is IC 1369, and the large dark nebula is Barnard 361, both of which are in Cygnus. B361 is in the foreground at around 1,200-1,800 light years; the cluster is farther away at about 6,700 light years distant. Did you notice the small red patch left of bottom-centre? It is emission nebula Sh2-89.
People see all kinds of patterns in images like this. I see a witch on a broomstick flying out of the upper right corner, with two bright eyes, a cape flying behind her, and her black dress billowing in the wind underneath. Mwahaha. What do you see?
Tekkies:
Acquisition, focusing, guiding and control of Paramount MX mount with TheSkyX. Focus with Optec DirectSync motor and controller. Automation with CCDCommander. Equipment control with PrimaLuce Labs Eagle 3 Pro computer. All pre-processing and processing in PixInsight. Acquired from my SkyShed in Guelph. Average or better transparency and seeing. Data acquired June 13-17, 2020 in a moonless sky.
Luminance: Sky-Watcher Esprit 150 f/7 refractor and QHY 16200-A camera with Optolong UV/IR filter
Chrominance: Takahashi FSQ-106 ED IV @ f/3.6 and QHY367C one-shot colour camera with Optolong UV/IR filter
Chrominance: 90 x 3m = 4hr30m
Total: 8hr40m
Data Reduction and Initial Processing
Preprocessing: The WeightedBatchPreProcessing script was used to create a Luminance master frame (from the mono camera) and a Drizzled RGB master frame (from the one-shot colour camera). The MURE Denoise script was applied to Luminance master. Damaged cores of a few bright stars in the Drizzled colour frame were replaced with corresponding pixels from a scaled-up non-drizzled master.
Gradient Removal: DBE was applied to L and RGB masters using Subtraction.
Colour
Channel Registration: To improve channel registration, the colour channels of the RGB master were extracted and aligned with StarAlignment, using Thin Plate Splines with Distortion Correction and the luminance master as the reference frame. The registered colour channels were recombined with ChannelCombination.
Colour Balancing: Colour was balanced with PhotometricColorCalibration.
Linear Noise Reduction: MultiscaleLinearTransform was used to reduce noise in the background areas, using an internal mask to protect bright structures. Layer settings for threshold and strength: Layer 1: 5.0 0.85, 2 iterations; Layer 2: 3.5, 0.75, 2 iterations.
Stretching: HistogramTransformation was applied to make a pleasing, bright image, with background set to an intensity of approximately 0.10.
Lightness
Linear Noise Reduction: MultiscaleLinearTransform was used to reduce noise in the background areas, using an internal mask to protect bright stars. Layer settings for threshold and strength: Layer 1: 3.0 0.85, 1 iterations; Layer 2: 2.0, 0.75, 2 iterations.
Stretching: HistogramTransformation was applied to make a pleasing, bright image, with background set to an intensity of approximately 0.10.
Combining Lightness and Colour Images
LRGB Combination: The lightness image was applied to the RGB image using LRGBCombination with default settings.
Additional Processing
Nonlinear Noise Reduction: TGVDenoise was used in L*a*b* mode to reduce noise with a mask used to target the background areas and protect the stars (max. 1,000 iterations and convergence selected for both lightness and chrominance).
Final Steps: Background and star brightness, contrast, and colour saturation were adjusted in several iterations using CurvesTransformation with masks as required. ICCProfileTransformation (sRGB IEC61966-2.1; Relative Colorimetric with black point compensation) was applied prior to saving in jpg format.


Hi.. ver y nice and a lot of pre and post processing.. just one question how do you blend different digital data from 2 different cameras….?
I blend them exactly as explained in the post. Thanks for looking!