WR 134
 Click here for full size image (large file!)
July 15, 2025
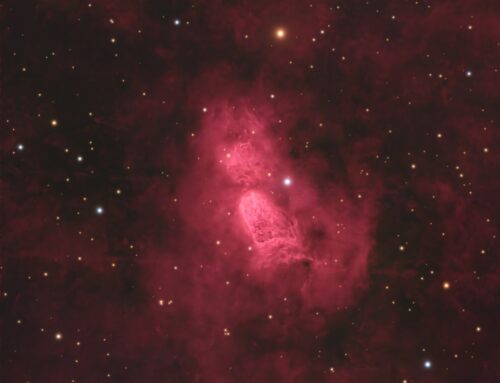
WR 134 is not easily distinguished in this image. It’s aone of the brighter star to the lower left of the teal-coloured arc. That structure is part of a nebula being blown out by the hot stellar winds coming from WR 134. This field is in Cygnus, a rich region for imaging during summer and fall in the Northern Hemisphere. All of the objects in this image are 5,000-6,000 light years away. In addition to WR 134, they include a couple of objects I’m currently imaging with the C14 EDGE, namely Sh2-104 at top left and Sh2-101 (the Tulip Nebula) at lower right. The entire field is just a little southeast of the gamma-Cyg field that I imaged last week with the same setup, except the filter. This image was made with an Optolong L-Ultimate filter, which passes 3 nm bands of hydrogen and oxygen emissions.
This is the second image for a new telescope: the Sky-Watcher Esprit 70 EDX. Unlike the Esprit 80mm, this scope has an image circle that can cover a full-frame 35mm sensor with pinpoint stars. The field of view is a whopping 4.5 x 3 degrees. Focus was stable over a 3C temperature range (I focused only twice, manually, at the start and middle of a 6.5-hour imaging run). They will hopefully be available to buy later in 2025.

Tekkies:
Acquisition, focusing, and control of Paramount MX mount and other equipment with N.I.N.A. and TheSkyX. Unguided, manual focus. Equipment control with Primalucelab Eagle 4 Pro computer. All pre-processing and processing in PixInsight. Acquired from my SkyShed in Guelph. Acquired under average transparency and seeing and a first-quarter Moon on the night of July 8-15, 2025.
First Light with Sky-Watcher Esprit 70 EDX refractor. QHY367C Pro camera with Optolong L-Quad Enhance filter.
86 x 5m with L-Ultimate filter = 7hr 10m

Preprocessing: The WeightedBatchPreProcessing script was used to perform calibration, cosmetic correction, debayering, weighting, registration, integration and Drizzle integration of all frames (2x drizzle, 1.0 Drop Shrink).
Gradient Removal: SpectrophotometricFluxCalibration was applied followed by MultiscaleGradientCorrection.
Colour Calibration: BlurXterminator was applied to the RGB master with Correct Only selected, followed by SpectrophotometricColorCalibration.
Deconvolution: BlurXterminator was applied to the RGB master with Automatic psf , star sharpening set to 0.5, and non-stellar set to 0.9.
Linear Noise Reduction: NoiseXterminator was applied with settings Amount=0.9 and Iterations=4.
Stretching: HistogramTransformation was applied to make a pleasing image with background approximately 0.08.
Nonlinear Processing
Star Removal: StarXterminator was used to remove the stars from the master, with default settings, except Large Overlap was selected. The stars-only image was retained.
Nonlinear Noise Reduction: NoiseXterminator was applied with Amount=0.9 and Iterations = 4
Re-stretch: HistogramTransformation was used to boost contrast by moving the dark point to the toe of the histogram and slightly decreasing the mid-point slider.
Contrast Enhancement: LocalHistogramEqualization was applied twice. A Contrast Limit of 1.5 and 1 iteration was used for each LHE application (scale 50, strength 0.25; scale 320, strength 0.18).
Sharpening: MultiscaleMedianTransform was applied. (Layers 2 – 4 with strengths of 0.03 0.04, and 0.02 respectively).
Contrast, Brightness and Colour: Brightness, contrast, hue, and saturation were adjusted in several iterations using CurvesTransformation and the Jurgen Terpe Selective Color Correction script, with masks as required.
Stars-only steps: The CIE L* channel (i.e. the lightness channel) was extracted from the stars-only image and then applied to the star image as a mask. CurvesTransformation’s Saturation slider was used to boost colour in the stars.
Star Restoration: The PixelMath expression combine(starless, stars, op_screen()) was used to combine the starless starless image with the stars-only image. The StarReduction script was applied with small star protection enabled (Tranfer method, strength 0.4) to slightly reduce the larger stars.
Final Steps: Background, nebula, and star brightness, contrast, and saturation were adjusted in several iterations using CurvesTransformation with masks as required. ICCProfileTransformation (sRGB IEC61966-2.1; Relative Colorimetric with black point compensation) was applied prior to saving as a jpg. The finder chart was made using the FindingChart process. The annotated image was made with the AnnotateImage script.


Thank you, Ron for your sharing your images, and detailed workflow.
Aside from the final image looking amazing, you outlining your workflow is a tremendous help.
All of your projects are inspiring, your processing techniques are much appreciated.
Clear skies (and cool nights).