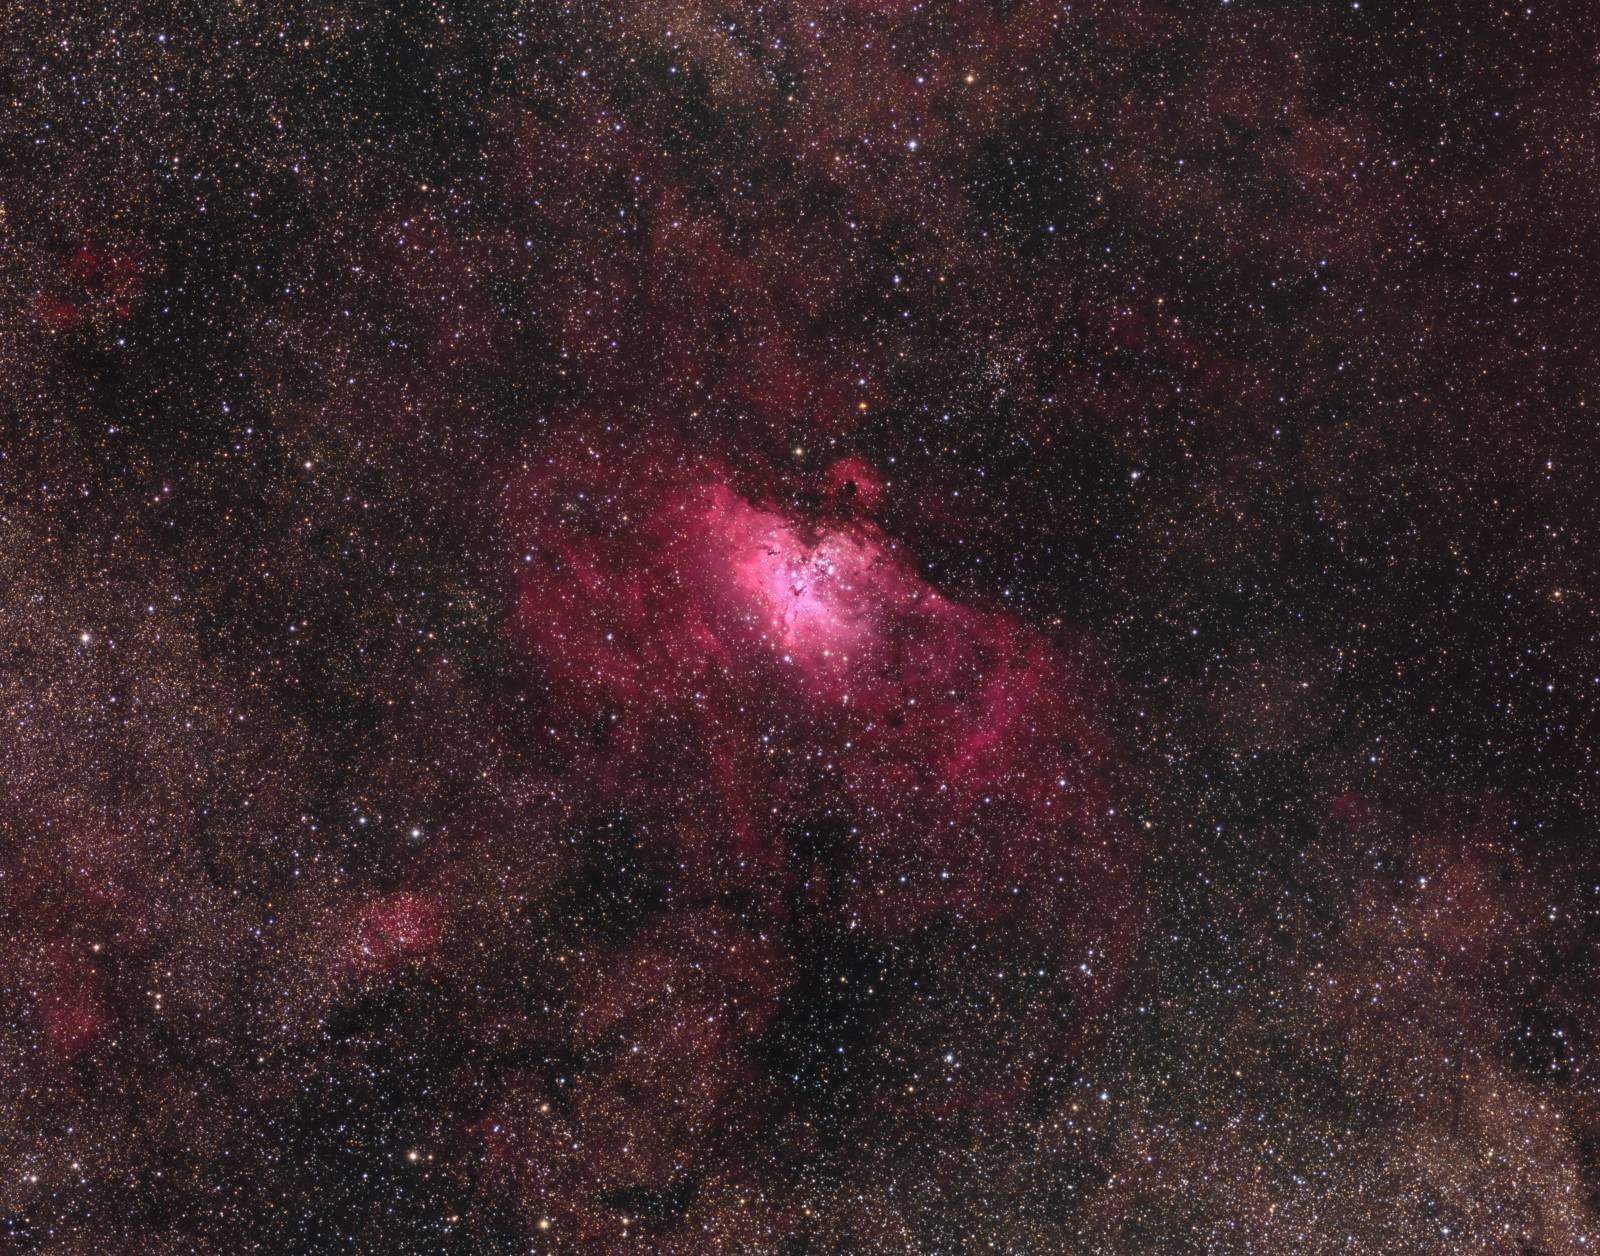
M16, Eagle Nebula Wide Field
Click image for full size version
July 13, 2017
The Eagle Nebula, M16, is in Serpens, about 7,000 light years away. It includes a star cluster just 1-2 million years old as well as the intricate emission nebula that fills centre of the image. Like many of the Messier objects, Messier didn’t discover the Eagle. It was first observed by Jean-Philippe de Cheseaux in 1745-46. The structures at the centre are known as “the Pillars of Creation,” made famous by the Hubble Space Telescope’s amazing photo.
I have imaged the eagle nebula twice before, both at much higher focal length. One image focused on the famous Pillars of Creation, and the other shows a slightly wider field view. Neither of these previous images show the many other nebulae and star clusters that lie around the Eagle, which lies in the thick of the summer Milky Way. One object that isn’t identified in the annotated image is the pretty open cluster Trumpler 32 (Tr 32), which is obvious to the upper right of the Eagle’s “head.” There are also numerous dark nebulae in the field, such as LDN 376 (just above Sh2-48) and LDN 380 (about halfway between vdB 122and Sh2-48).
Tekkies:
Moravian G3-16200 EC camera (on loan from O’Telescope), Optolong Ha, O3, R, G and B filters, Takahashi FSQ-106 ED IV at f/3.6, Paramount MX, unguided. Acquisition with the SkyX, focused with FocusMax. All pre-processing and processing in PixInsight. Acquired from my SkyShed in Guelph. Gibbous to full moon for Ha and O3, new to crescent moon for RGB, average transparency and poor seeing.
14x10m R, G and B, 8x20m Ha and 17x10m O3 unbinned frames (total=12hr30m).
NB-RGB Creation
Creation and cleanup: The BatchPreProcessing script was used to perform calibration, cosmetic correction and registration of all frames. DrizzleIntegration was used to make the channel masters. The R, G, B, Ha and O3 masters were cropped to remove edge artifacts. R, G and B were combined to make an RGB image which was processed with DBE, BackgroundNeutralization and ColorCalibration.
Combining Ha, O3 and RGB data: The NBRGBCombination script was run with default settings using Ha for red narrowband and O3 for green and blue. BackgroundNeutralization was applied.
Linear Noise Reduction: MultiscaleLinearTransform was used to reduce noise in the NB-RGB image. Layer settings for threshold and strength: Layer 1: 5.0 0.9 Layer 2: 3.0, 0.8 Layer 3: 2., 0.51 Layer 4: 1.0, 0.25 Layer 5: 0.5, 0.28.
Stretching: HistogramTransformation was applied to the NB-RGB image to make a pleasing, bright image.
Synthetic Luminance:
Creation and cleanup of SynthL: The linear Ha, O3, R, G and B masters were combined using the ImageIntegration tool (average, additive with scaling, noise evaluation, iterative K-sigma / biweight midvariance, no pixel rejection). DBE was applied.
Deconvolution: A star mask was made to use as a local deringing support image. A copy of the image was stretched to use as a range mask. Deconvolution was applied (50 iterations, regularized Richardson-Lucy, external PSF made using DynamicPSF tool with about 30 stars).
Linear Noise Reduction: MultiscaleLinearTransform was used to reduce noise in the background areas of the NB-RGB file. Layer settings for threshold and strength: Layer 1: 5.0 0.9 Layer 2: 3.0, 0.8 Layer 3: 2., 0.51 Layer 4: 1.0, 0.25 Layer 5: 0.5, 0.28.
Stretching: HistogramTransformation was applied to the SynthL to make a pleasing, bright image.
Noise Reduction and Re-Stretch: TGVDenoise was applied in Lab mode with 300 iterations with a range mask used to protect high signal areas. This was followed by a HistogramTransformation to raise the black point (but with no clipping).
Combining SynthL with NB-RGB:
The processed SynthL was applied to the NB-RGB image using LRGBCombine.
Additional Processing
Contrast Enhancement: The contrast was boosted with LocalHistogramEqualization with max contrast of 1.5 for 0(scale 50, strength 0.75) using a mask to protect background and stars. The mask was made by making a very blurred range mask with the RangeSelection tool and a star mask with the StarMask tool, and then using PixelMath to subtract the star mask from the range mask.
Final Steps: MultiscaleLinearTransform was used to sharpen the structures in the bright parts of the nebulae (layers 2-4 at 0.05). Background, nebula and star brightness, contrast and saturation were adjusted in several iterations using Curves with masks as required. Stars were reduced in size using the Morphological Selection mode of the MorphologicalTransformation tool. The image was rescaled (downsampled x2) back to the original image scale for this setup.
Image scale is about 3.2 arcsec per pixel for this camera / telescope / combination.

Leave A Comment