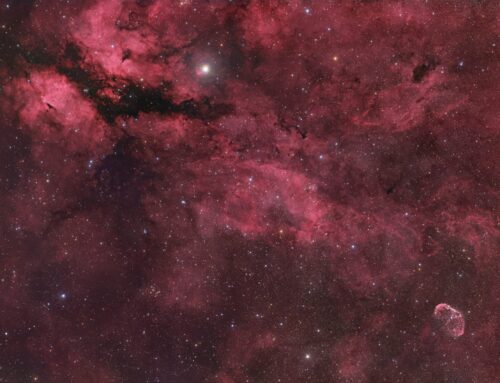
Tulip Nebula Wide Field Click image for full size version
June 13, 2018
When I started shooting this image, the Tulip Nebula (a.k.a. Sh2-101) was centred as the main subject. But in investigating this region I found some interesting bright nebulosity and dark regions nearby. This led me to put the Tulip in the upper left to show off some of these overlooked tendrils of hydrogen gas.
This large region of nebulosity is located in Cygnus, the Swan, about 6,000 light years distant. Just to the lower left of the Tulip is one of the first suspected black holes, Cygnus X-1.
This will be the last image I post using the FSQ-106 for the time being; it is back in storage. I have mounted a Sky-Watcher Esprit 150 in its place, and have already started to get nice images with it, so stay tuned.
Tekkies:
Moravian G3-16200 EC camera, Optolong Ha, R, G and B filters, Takahashi FSQ-106 ED IV at f/3.6, Paramount MX. QHY5 guide camera on 175mm guide scope. Acquisition with the SkyX, focused with FocusMax, scripted with CCD Commander. All pre-processing and processing in PixInsight. Acquired from my SkyShed in Guelph. Moderate moonlight for Ha, no moonlight for RGB, average or better transparency and below average to average seeing.
25x10m R, G and B and 49x10m Ha unbinned frames (total=20hr10m).
RGB:
Creation and cleanup: The BatchPreProcessing script was used to perform calibration, cosmetic correction and registration of all frames. LocalNormalization was applied, and ImageIntegration and DrizzleIntegration were used to make the Ha, R, G and B masters using Local Normalization for scaling. The R, G, B masters were processed with DynamicBackgroundExtraction. The R, G and B were combined to make an RGB image which was processed with PhotometricColorCalibration.
Linear Noise Reduction: MultiscaleLinearTransform was used to reduce noise in the RGB image. Layer settings for threshold and strength: Layer 1: 3.0 0.8 Layer 2: 2.5, 0.7 Layer 3: 2., 0.6 Layer 4: 1.0, 0.2 Layer 5: 0.5, 0.1.
Stretching: HistogramTransformation was applied to make a pleasing, bright image. Curve was applied to boost contrast and saturation.
Synthetic Luminance:
Creation and cleanup of SynthL: The R, G and B channel masters were integrated (average, noise weighted, no rejection) using ImageIntegration to create the SynthL.
Deconvolution: A star mask was made to use as a Local Deringing Support image. A copy of the image was stretched to use as a range mask. Deconvolution was applied (50 iterations, regularized Richardson-Lucy, external PSF made using DynamicPSF tool with about 30 stars).
Linear Noise Reduction: MultiscaleLinearTransform was used to reduce noise in the background areas of the SynthL. Layer settings for threshold and strength: Layer 1: 3.0 0.9 Layer 2: 2.0, 0.75 Layer 3: 1.0, 0.6 Layer 4: 0.5, 0.2.
Stretching: HistogramTransformation was applied to the SynthL to make a pleasing, bright image.
Noise Reduction and Re-Stretch: TGVDenoise was applied in Lab mode with 300 iterations with a range mask applied to protect high signal areas. This was followed by a HistogramTransformation to raise the black point (but with no clipping).
H-alpha:
Deconvolution: A star mask was made to use as a Local Deringing Support image. A copy of the image was stretched to use as a range mask. Deconvolution was applied (80 iterations, regularized Richardson-Lucy, external PSF made using DynamicPSF tool with about 20 stars).
Linear Noise Reduction: MultiscaleLinearTransform was used to reduce noise in the background areas of the Ha image. Layer settings for threshold and strength: Layer 1: 3.0 0.9 Layer 2: 2.0, 0.75 Layer 3: 1.0, 0.6 Layer 4: 0.5, 0.2.
Stretching: HistogramTransformation was applied to the Ha to make a pleasing, bright image.
Combining SynthL, RGB and Ha:
SynthLRGB: The processed SynthL was applied to the RGB image using LRGBCombine.
SynthLHaRGB: PixelMath was used to add Ha to the red channel and also a small amount to the blue channel, only for pixels where Ha was brighter than the HaRGB.
Additional Processing:
Shrinking the Stars: StarReductionScript was applied and the result blended back 50/50 with the original. The Local Deringing Support Image used for deconvolution was used to protect the brightest stars.
Sharpening: Using a mask to protect stars, background and dim nebulosity, MultiscaleLinearTransform was applied to sharpen layers 2 and 3 (bias of 0.1 and 0.2, respectively).
Final Steps: Background, nebula and star brightness, contrast and saturation were adjusted in several iterations using Curves with masks as required. The DarkStructureEnhance script was applied with default settings. The image was downsampled by a factor of 2 using IntegerResample to restore the original resolution.
Image scale is about 3.2 arcsec per pixel for this camera/telescope combination.

Ron, When you are creating the SynthL channel data from the RGB are you using the individual subframe or the Master R G B? I am guessing you are going back to the subs since they are noise weighted. I have some nice Ha R G B data of the Cat’s Paw and wondering how best to integrate the data. Steve
I use the channel masters, not the individual files.