Deep-Sky Image Processing
May 1, 2014
INTRODUCTION:
PixInsight (PI), Photoshop, MaximDL and ImagesPlus are examples of software that provides amateur astronomers with a way to turn digital image data into visual art. These programs are very powerful with vast capabilities, and it can be hard to know which processing steps to use and when to use them.
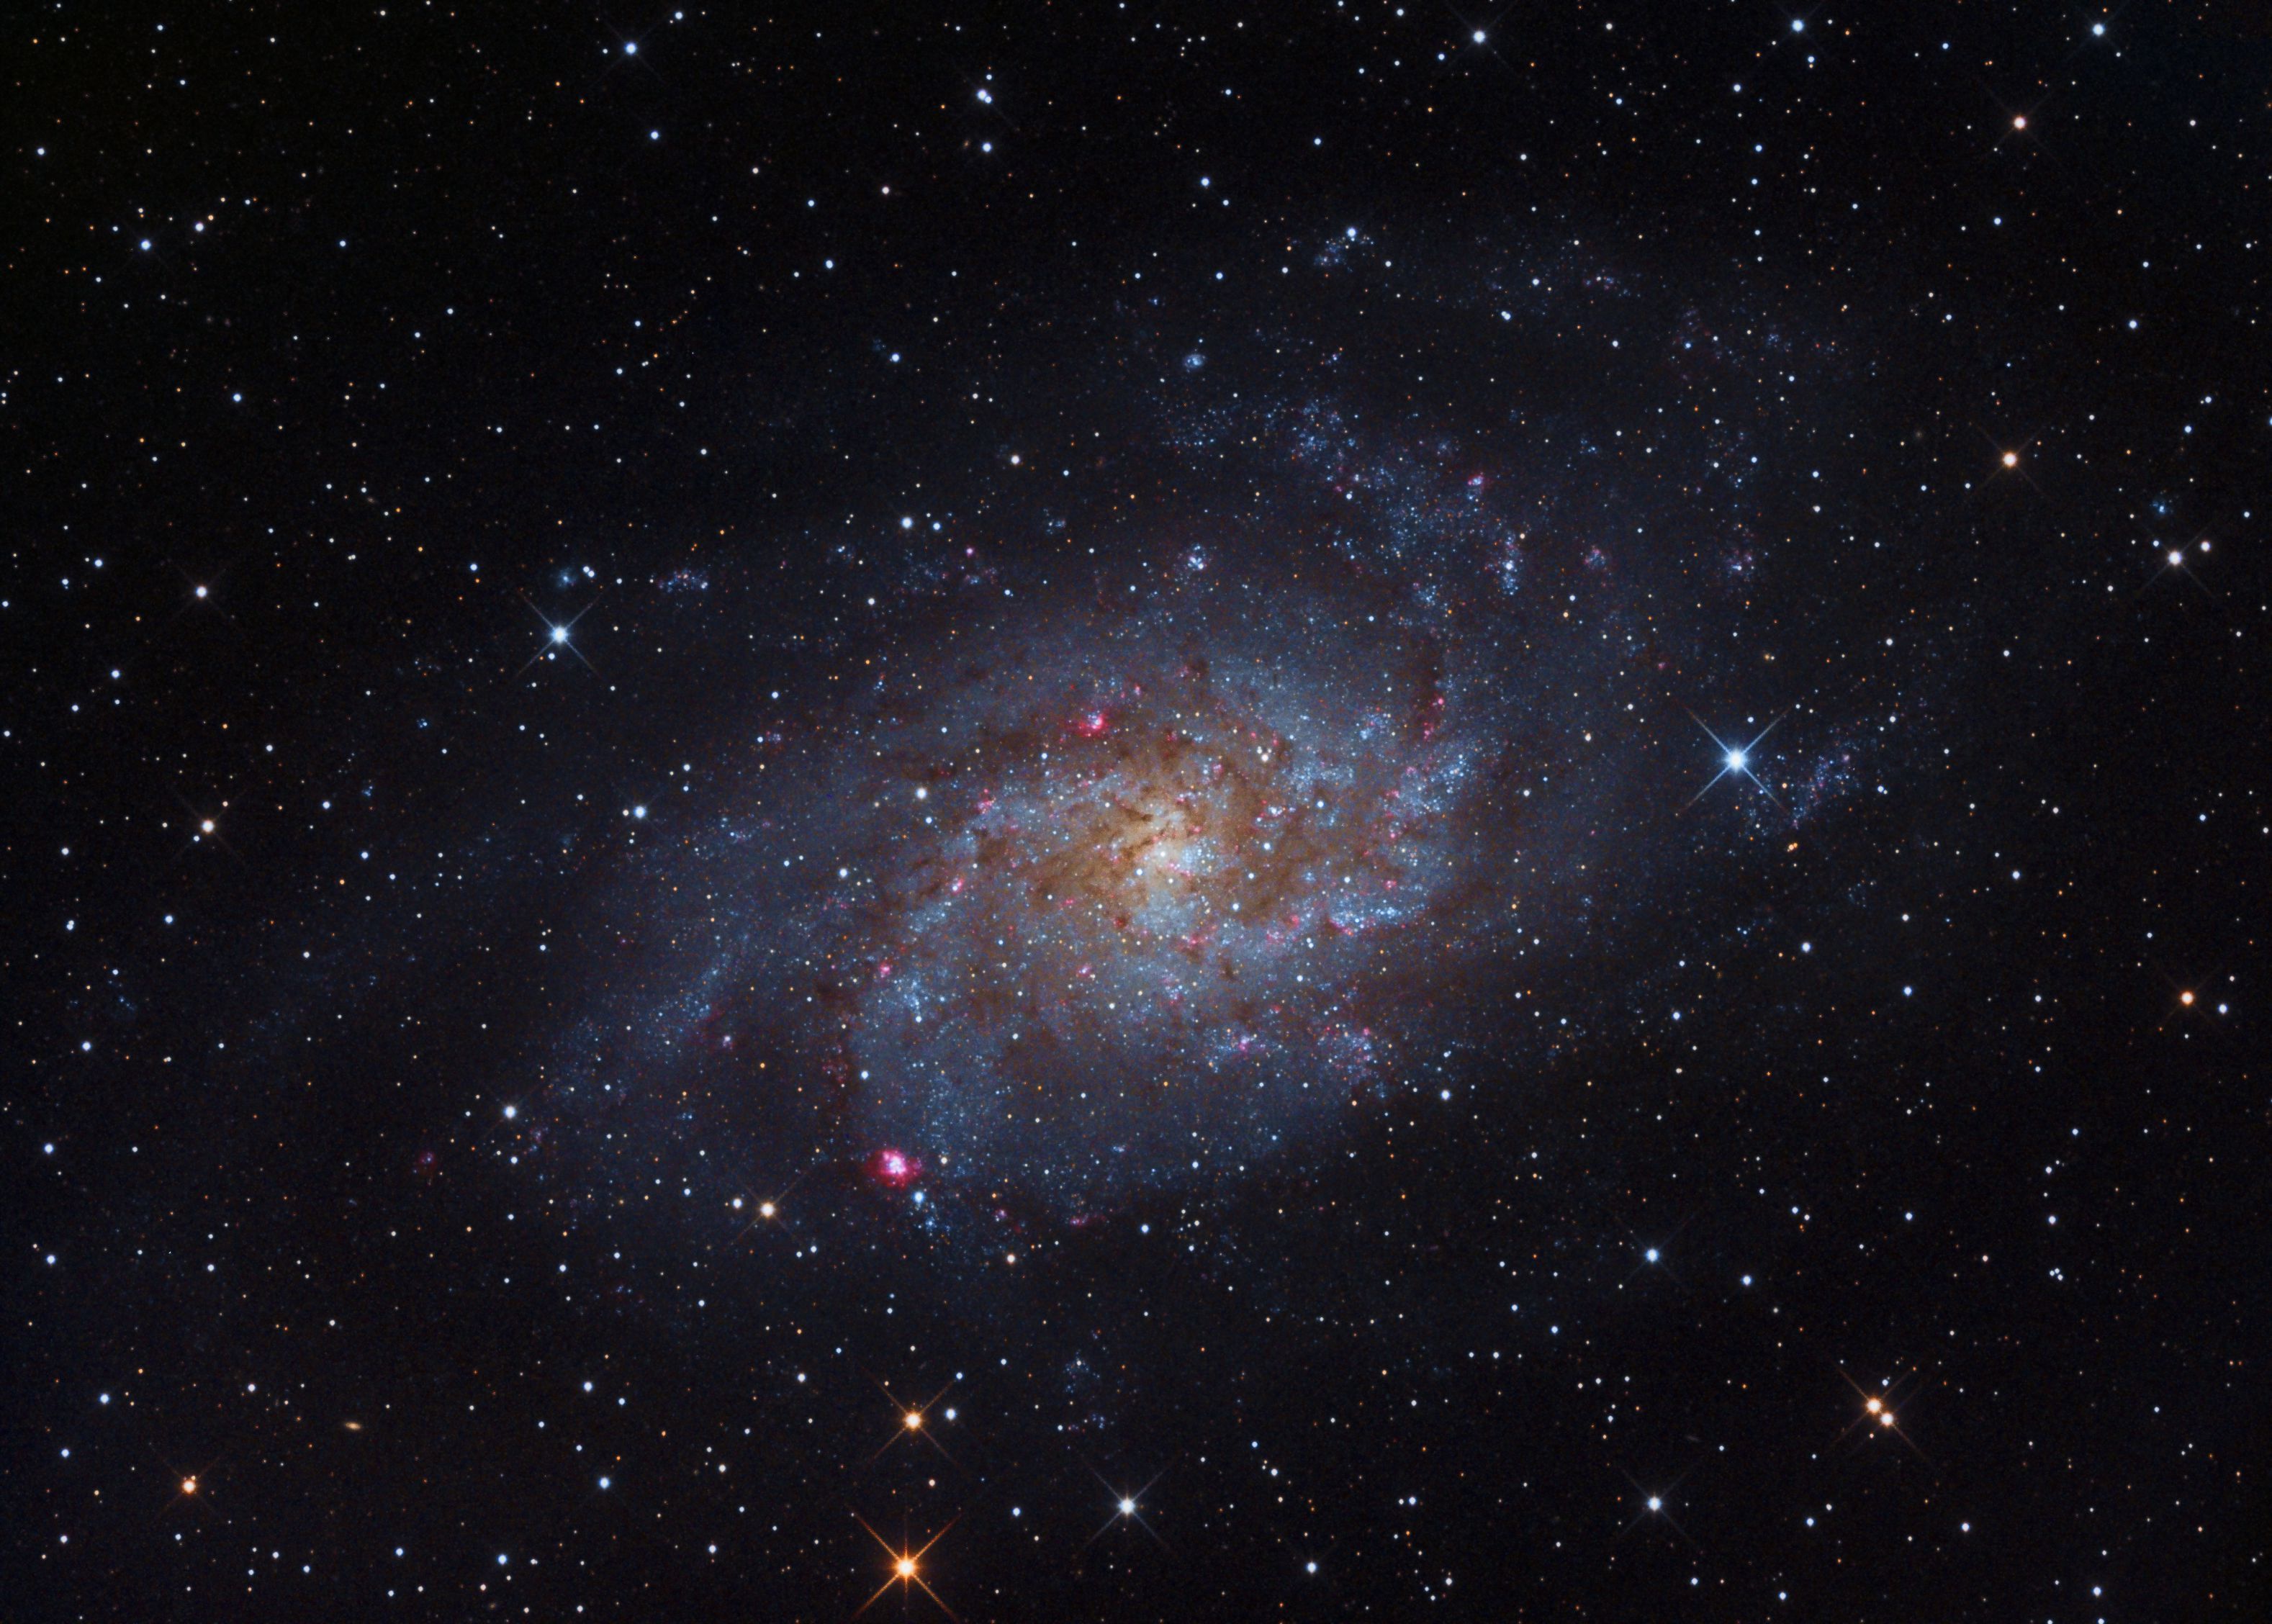
This image of M33 was made with a mono camera using luminance and RGB filters. Total exposure was 2 hr 22m using a 10″ f/3.6 ASA astrograph.
This article lays out my typical workflow for processing images, starting with raw frames out of the camera. My processing varies from image to image, but it stays remarkably close to this workflow for all images. If a step doesn’t seem to improve things, I leave it out. I’ve indicated which steps are optional if you’re just getting familiar with image processing. Note that this is just MY typical workflow; other imagers use other steps or different orders. Don’t be afraid to experiment.
I use a mono CCD camera with a filter wheel, but most of these steps apply to both colour and mono images/cameras, unless noted otherwise (or obvious!). I do almost all my processing with PixInsight, but other programs have similar processing tools available.
There is a wealth of resources online for learning about whichever software you choose. For example, PixInsight has user forums, loads of free videos (e.g. Harry’s Astroshed), as well as paid video tutorials like IP4AP (Image Processing for Astrophotography), all of which I have personally used to learn PixInsight. Similar resources are available for other processing software.
Okay, fasten your seat belt…
PART 1 – CRUNCHING THE DATA
Before an image can be processed, a night (or more) of raw data must be combined into a master colour frame (or master frames for each filter used). This is commonly called “pre-processing.” It begins with individual short exposures, or “frames”, which are combined to produce a far better result than any individual frame.
1. Calibrate and Convert Raw Files
The type of raw frame you have will depend on the kind of camera you use, but whatever the camera, every raw frame should be calibrated. I use MaximDL with flats, darks and bias frames to clean up my raw frames. There is lots of information on image calibration available elsewhere so I won’t go into it in detail here. I save the calibrated files as 16-bit FITS files.
Single, raw 10m exposure. Zoom in to see how noisy it is, and the obvious fall off in brightness at the corners. These defects are fixed by calibration.
2. Throw Away Bad Frames
PixInsight’s Blink process is a great way to quickly identify and delete bad frames from any further processing. This saves disk space and gives better results. Frames can be bad for all kinds of reasons: clouds, stray light (or dawn), airplanes or bright satellites, etc.
3. Align the Good Frames
In my system, tiny (but annoying) amount of distortion comes from miscollimation, but only when I have frames from both sides of the meridian. I use PixInsight’s ImageRegistration process with Distortion Correction activated to achieve virtually perfect alignment of all frames. I use Maxim for aligning only when all the frames were acquired on the same side of the sky (so the miscollimation distortion is identical in all frames and isn’t an issue).
4. Combine the Aligned Frames
PixInisght’s ImageIntegration process gives many different options for combining data into master frames. Detailed advice pops up when you mouse over most of the boxes. I use sigma clipping methods, with the precise choice depending on my data.
Stacking multiple calibrated frames gives a smoother, more detailed image, but a brightness gradient is still obvious.
I usually combine Red, Green and Blue data to make a colour image at this point (sometimes I wait until after removing severe light pollution gradients). However, if you have luminance and H-alpha data, they need further processing on their own before they get added to the mix.
PART 2 – PROCESSING LINEAR IMAGES
Linear images are images that haven’t been subjected to “stretching” of the histogram. Stretching the histogram changes the relative brightness of different parts of the image. Once this has been done, some forms of image processing either don’t work as well or shouldn’t be done at all, so do these things before you adjust the black, grey or white points of your histogram.
5. Fix “Hot” and “Cold” Pixels (OPTIONAL)
Sometimes master frames still have a few hot and cold pixels visible – pixels that are much brighter or much darker than the pixels immediately surrounding them. These are leftovers from previous clean up steps. I use the PI CosmeticCorrection tool if there are lots. If I only see a couple, I use the PI Paint tool to correct them.
The severe colour gradients in this image can be easily corrected with software tools, such as Automatic Background Extraction in PixInsight.
6. Correct Gradients
Light pollution and vignetting (light fall off in the corners of an image), if not corrected, can severely limit the outcome of your processing. Fortunately there are excellent tools available to fix these problems. Before using these tools it is a good idea to crop the image file. I make sure to crop H-alpha and luminance channels exactly the same way to preserve alignment with the RGB, and then use PI’s Dynamic Background Extraction process to fix gradients in all channels.
7. Balance the Colour
When you photograph a person or a flower with a colour camera, it’s easy to compare the picture with reality and balance the colour accordingly. But in astrophotography you usually can’t see the real colour of the object with your own eyes, so other means are needed to try to produce an accurate, natural colour balance (or a deliberately inaccurate colour balance). I use three different methods in combination, depending on the image. First, when I combine Red, Green and Blue channels, I combine them based on how much of each my filters let through. I used a star of the same spectral class as the Sun (which produces what we see as “white light”) to learn that I should combine in a ratio of R:G:B = 1 : 0.9 : 0.85. Then I apply Background Neutralization and Colour Calibration processes in PI, as needed.
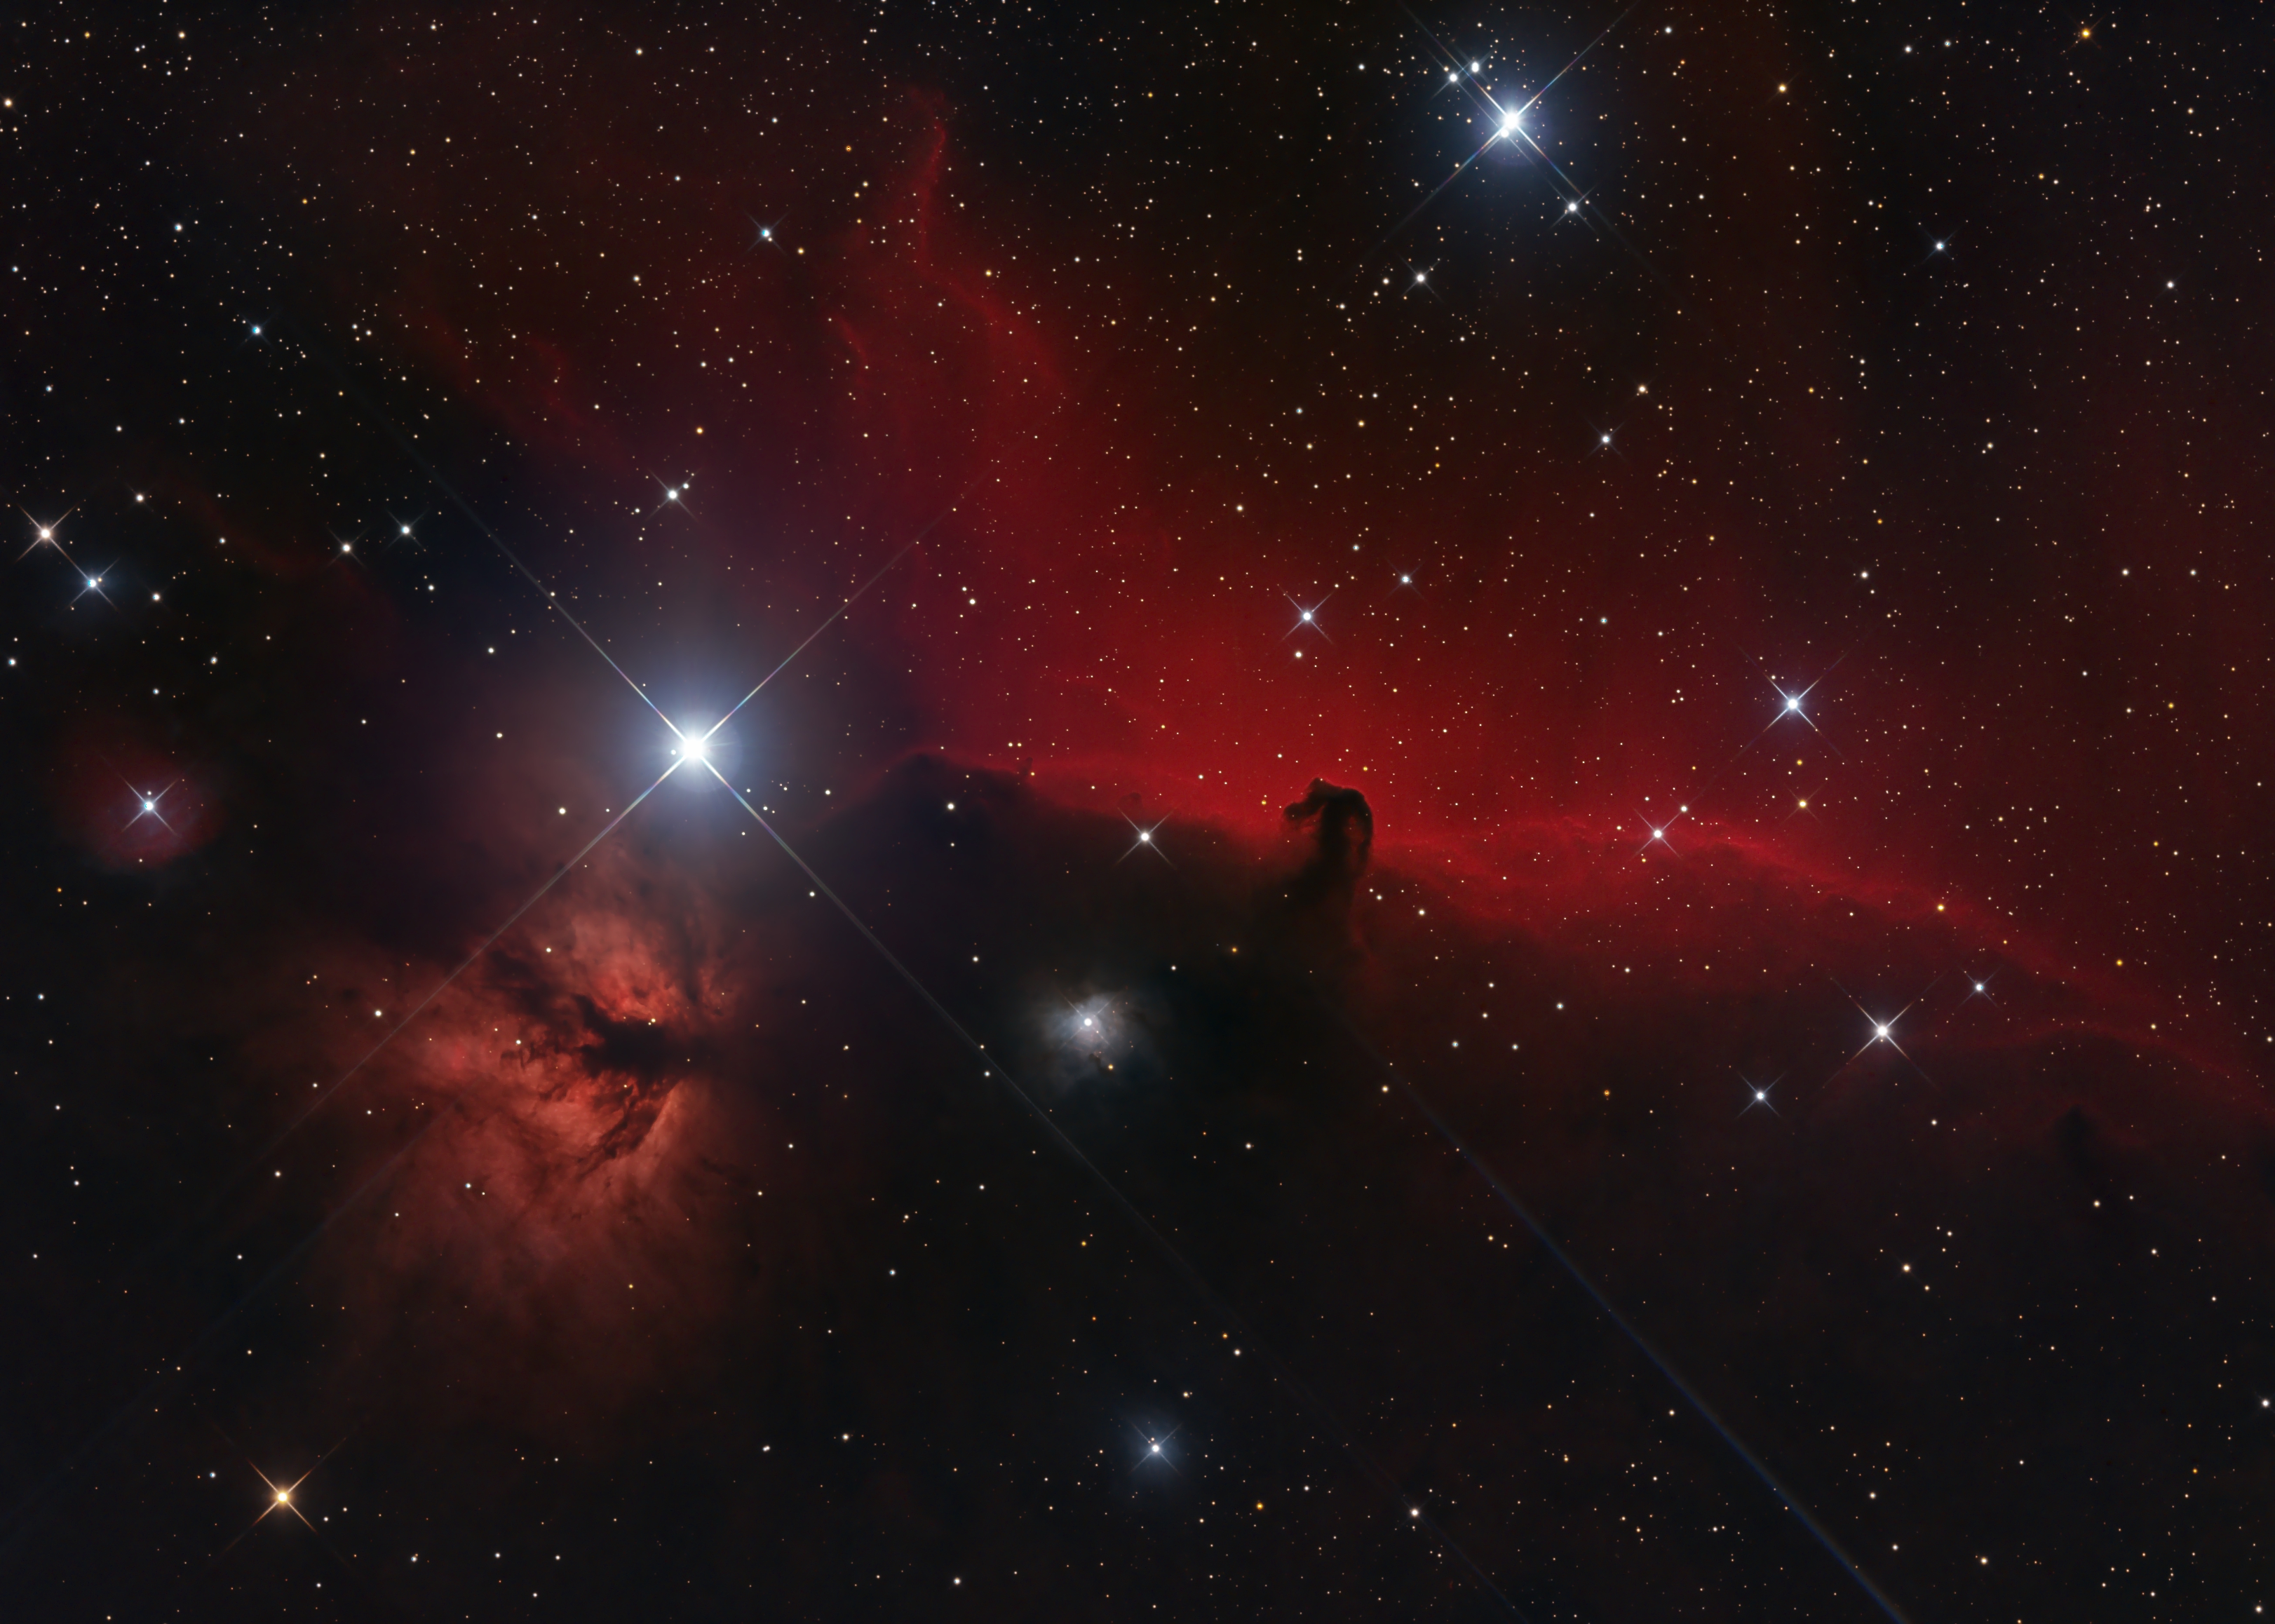
In this image of the Horsehead Nebula (B33), image data collected through the H-alpha filter was used to enhance the red nebulae.
8. Add H-alpha Data (OPTIONAL)
Adding Hydrogen alpha data to an image can really make red features pop. I almost always collect H-alpha data on emission nebulae and also on spiral galaxies that show knots of nebulosity. If I am going to include H-alpha data, this is where I fold it into the RGB image. I’ve seen lots of techniques to do this, and read all sorts of debates on the pros and cons of different methods. I struggled with this for a long time – especially with problems like grotesque, pink or burned out stars and the dreaded salmon pink colour in nebulae. That is, until I found the NB-RGB combine script in PixInsight. It’s really easy to use, and doesn’t damage the stars. It produces a rich red colour in nebulae. I usually need to go back and re-balance the colour after adding in H-alpha data.
9. Reveal More Detail with Deconvolution (OPTIONAL)
Turbulence in the atmosphere and imperfections in the optics cause blurring of astronomical images. The “true” image is “convolved” with these unwanted effects. Deconvolution is the process of removing them to enhance the amount of detail that can be seen. The imperfections are inferred from a “point spread function” – a mathematical description of the blurring, which can be determined from stars in the image, or just assumed to be Gaussian or any other shape. Deconvolution took me a long time to master, but this was largely because I was doing it too late in the process, and using the wrong settings. Deconvolution should be done on linear images only. Background areas need to be protected with a mask, and care has to be taken to avoid dark rings around overly sharpened stars. I usually use the Richardson-Lucy method, with 40-50 iterations. I use the smallest amount of deringing needed to just eliminate dark rings around the stars. A little too much deringing makes stars look soft. A bit more will ruin the stars. Deconvolution takes a fair amount of experimentation. No two images are the same, but you do get a feel for it. See here for more info.

Stretching the histogram requires adjusting the grey and black points. Be careful to avoid clipping the histogram by moving the black point too far to the right
10. (Finally!) Stretch the Image
It is finally time to stretch the image and make it non-linear. This is done by adjusting the brightness range to show off the very faint shades of grey in deep-sky images. There are a few different ways to do this. ImagesPlus and MaximDL users can use Digital Development; I use PixInsight’s Histogram Stretch Process. When stretching the image, make sure not to delete data at either end. I never move the white point (this would blow out stars), and I only move the black point enough that no “clipping” of the data occurs.
PART 3 – PROCESSING NON-LINEAR IMAGES
It’s time to capitalize on all the data cleanup we did before stretching. It is in the non-linear state that I do most of my noise reduction, colour saturation adjustment, contrast tweaking and sharpening.
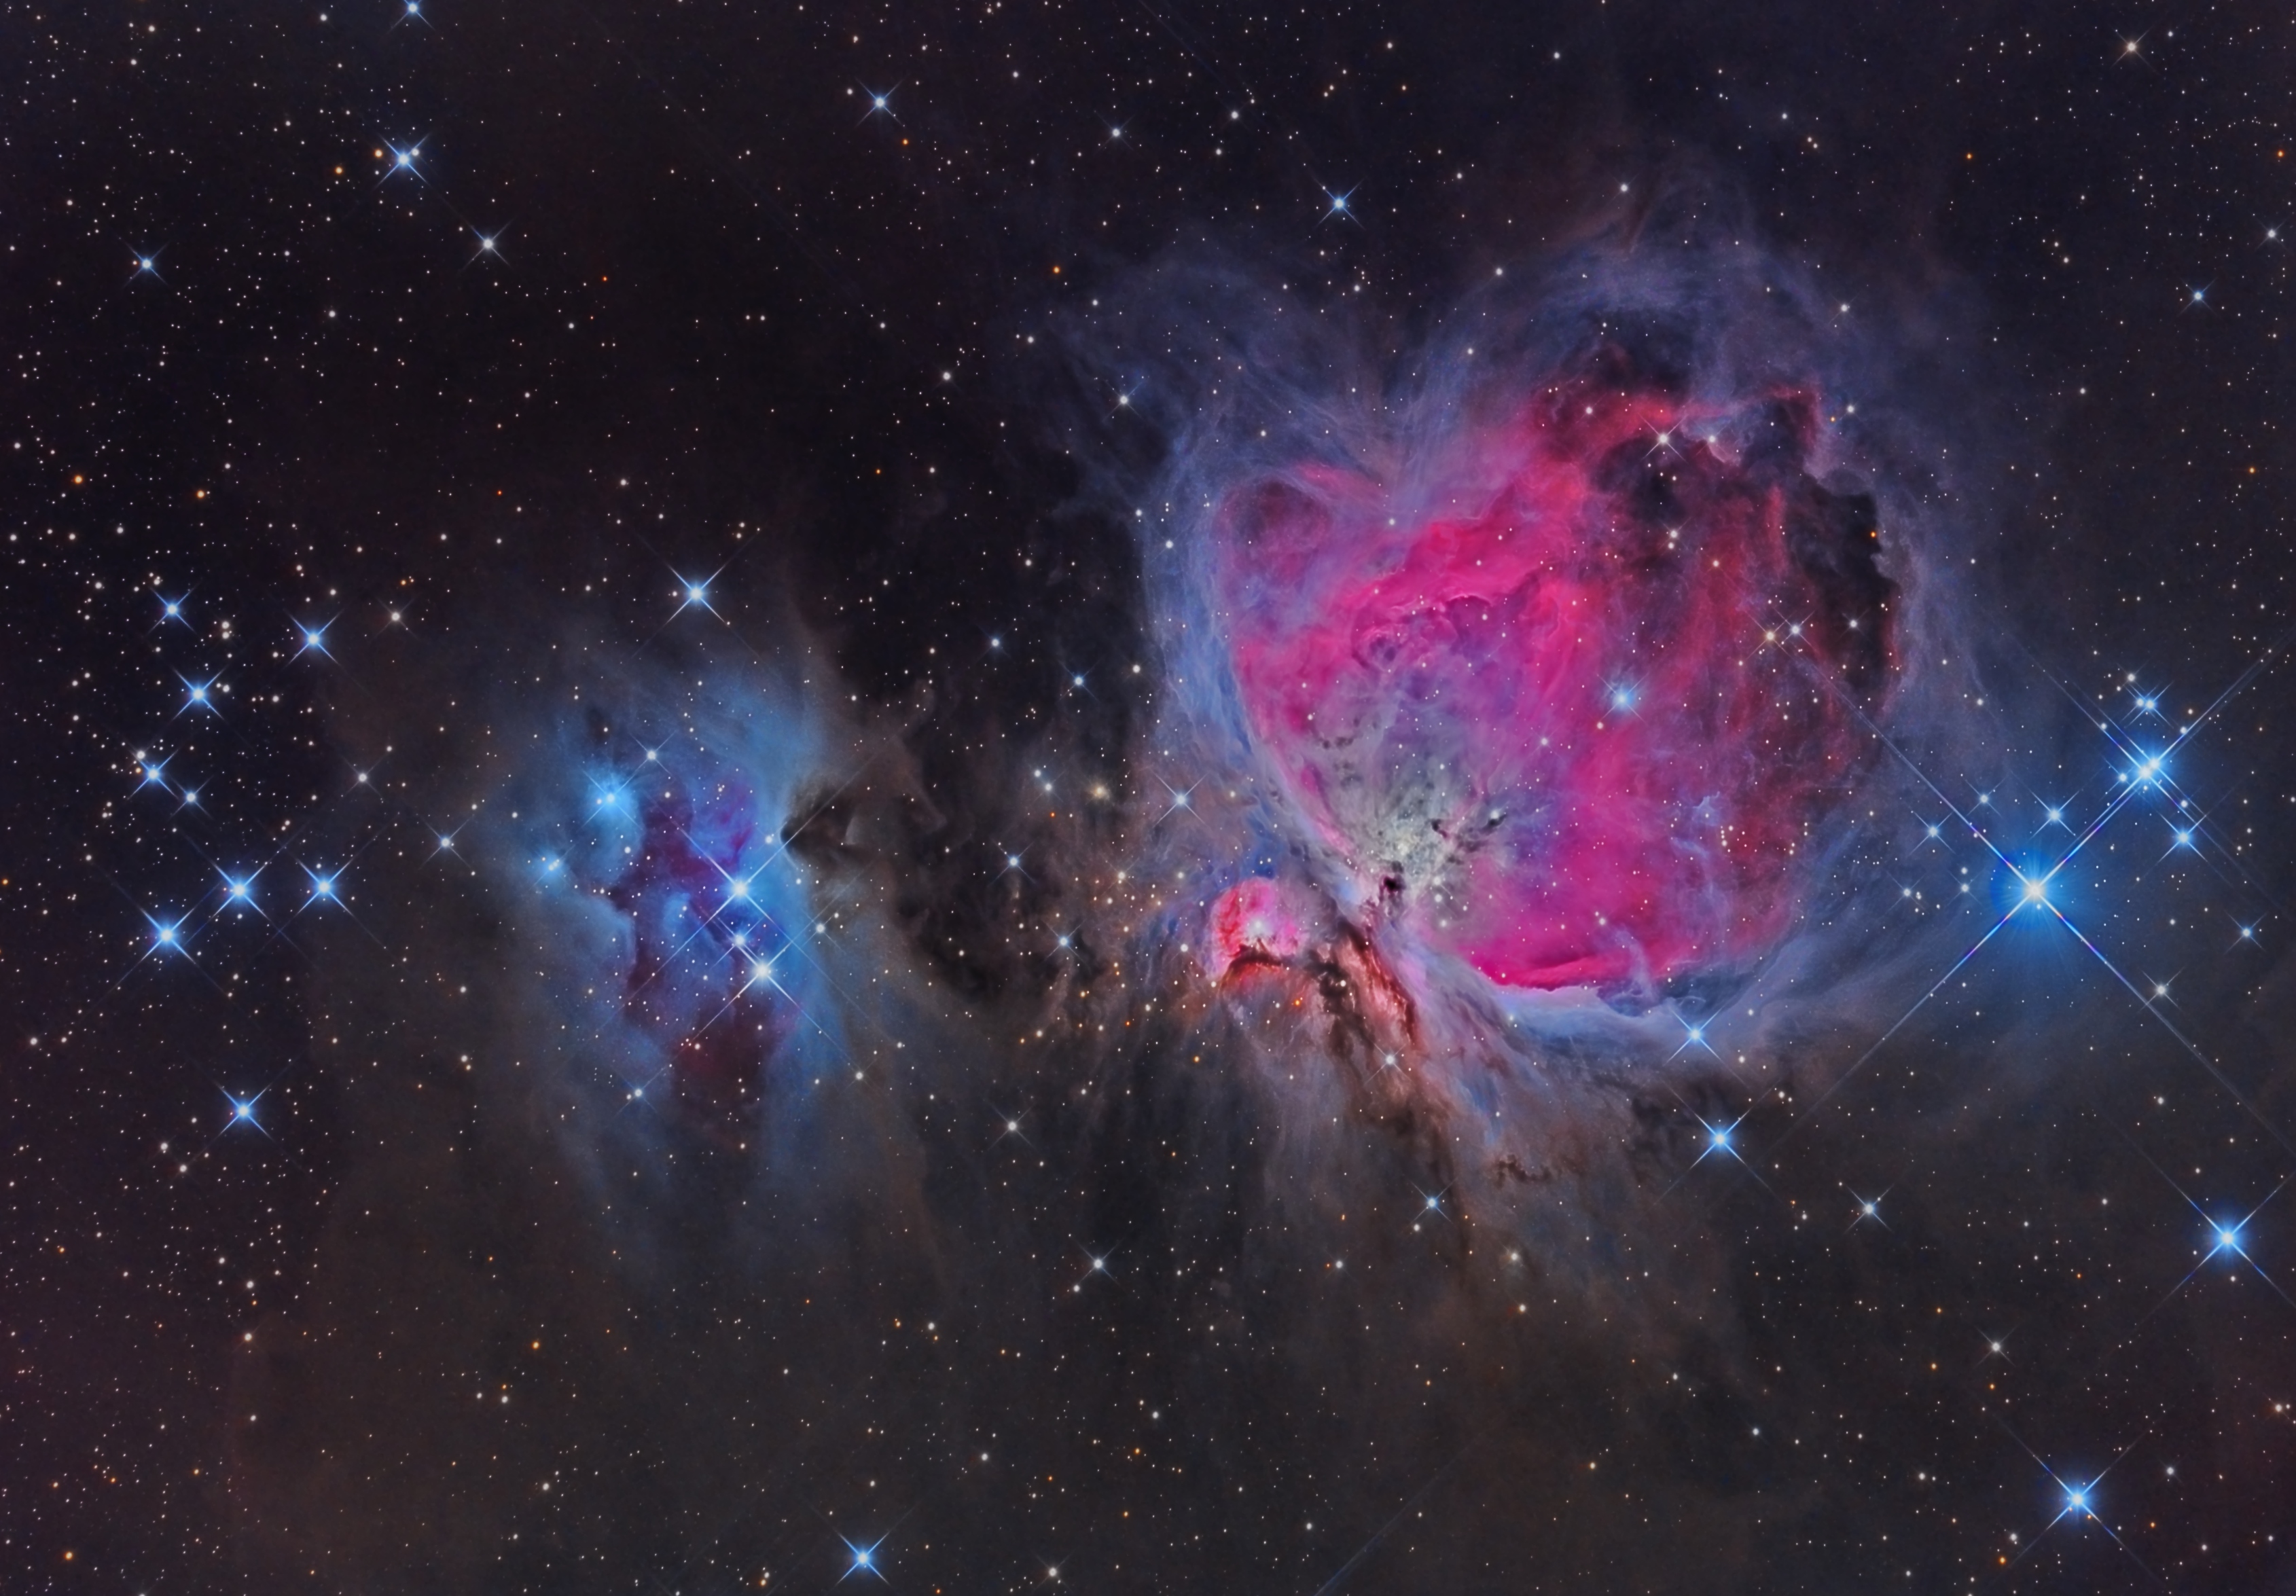
HDR Integration and HDRMultiscaleTransform were used to reveal the Trapezium in the bright core as well as faint structures on the margins of the nebulae.
11. Adjust Dynamic Range (OPTIONAL)
Some objects, like the Orion nebula have very bright areas and very dim areas. To see all of these well it’s necessary to adjust the dynamic range. I use HDR Multiscale Transform in PixInsight for this purpose. I usually run it at two different scales to deal with large and small structures. I always use a mask on bright stars to prevent dark “holes” in their cores. If you do this step, make sure you do step 13 to recover the contrast that you will lose.
12. Reduce Noise
I use separate methods for colour noise and brightness noise. If there is a greenish caste to the image, PI’s SCNR zaps it with a click of the mouse. I use PI’s ACDNR or TGV Noise process to reduce noise in the darkest areas of the image while protecting stars and other structures using masks. After applying noise reduction, I stretch the image again by moving the black and grey points – again taking care not to lose any data at the black end of the histogram (see step 10).
13. Adjust Local Contrast (OPTIONAL)
The dynamic range compression in step 11 tends to reduce contrast. That can be dealt with by adjusting the histogram in the structures that had their range compressed. Again, PI has a great tool for this: Local Histogram Equalization. I make a mask that protects the whole image except for the target of step 11. Details really pop! I either do both steps 11 and 13 or neither.
PART 4 – MAKING IT PRETTY
In step 4 I said that I hold off on adding the luminance (brightness) data to the colour data until late in the work flow. It’s almost time. First, I need to apply a couple more processing steps on the luminance image only, if I have one. If I don’t have luminance data, I do these steps on the RGB image.
14. Adjust Overall Contrast
The curves tool in Photoshop, PI, MaximDL, ImagesPlus and other programs can be used to tweak the overall contrast. The PI tool, in my opinion, is by far the most comprehensive and intuitive tool of the bunch, and the one I use.
15. Sharpen, then Soften (OPTIONAL)
I use Unsharp Mask in PI on just the features I want to sharpen, making sure to protect the background and bright stars with a mask. The Range Mask tool in PI is a good option for making a mask. Depending on the image, I sometimes sharpen at two different scales (say 0.9 pixels and 3 pixels) to enhance various sized features. After sharpening, I usually apply a slight blur about 0.3 px which, to me, makes it look more natural.
A mask was used to protect the background while the brightness and colour saturation of the stars and galaxies were increased.
16. Adjust Colour Saturation
Obviously this applies only to the colour image. I adjust the colour saturation in two steps. First, I use a mask to protect everything except bright stars, and increase the stars’ saturation. Next, I make a mask that protects background and stars, and increase saturation of the mid-tones, namely the target object.
PART 5 – COMBINING LUMINANCE AND RGB (OPTIONAL)
In general, the eye sees details and noise in the brightness channel only, and is less sensitive to colour noise. So a really clean brightness channel combined with a less detailed colour image can be a powerful combination to make a beautiful astroimage. It is only worthwhile combining L and RGB images if the luminance data is better (e.g. higher signal-to-noise; higher resolution) than the colour data. I often shoot only an hour each through Red, Green and Blue and then 8 hours through luminance. I get “just enough” colour data, and spend most of my time capturing luminance frames that largely determine how good the final image looks, in terms of resolution and noise.

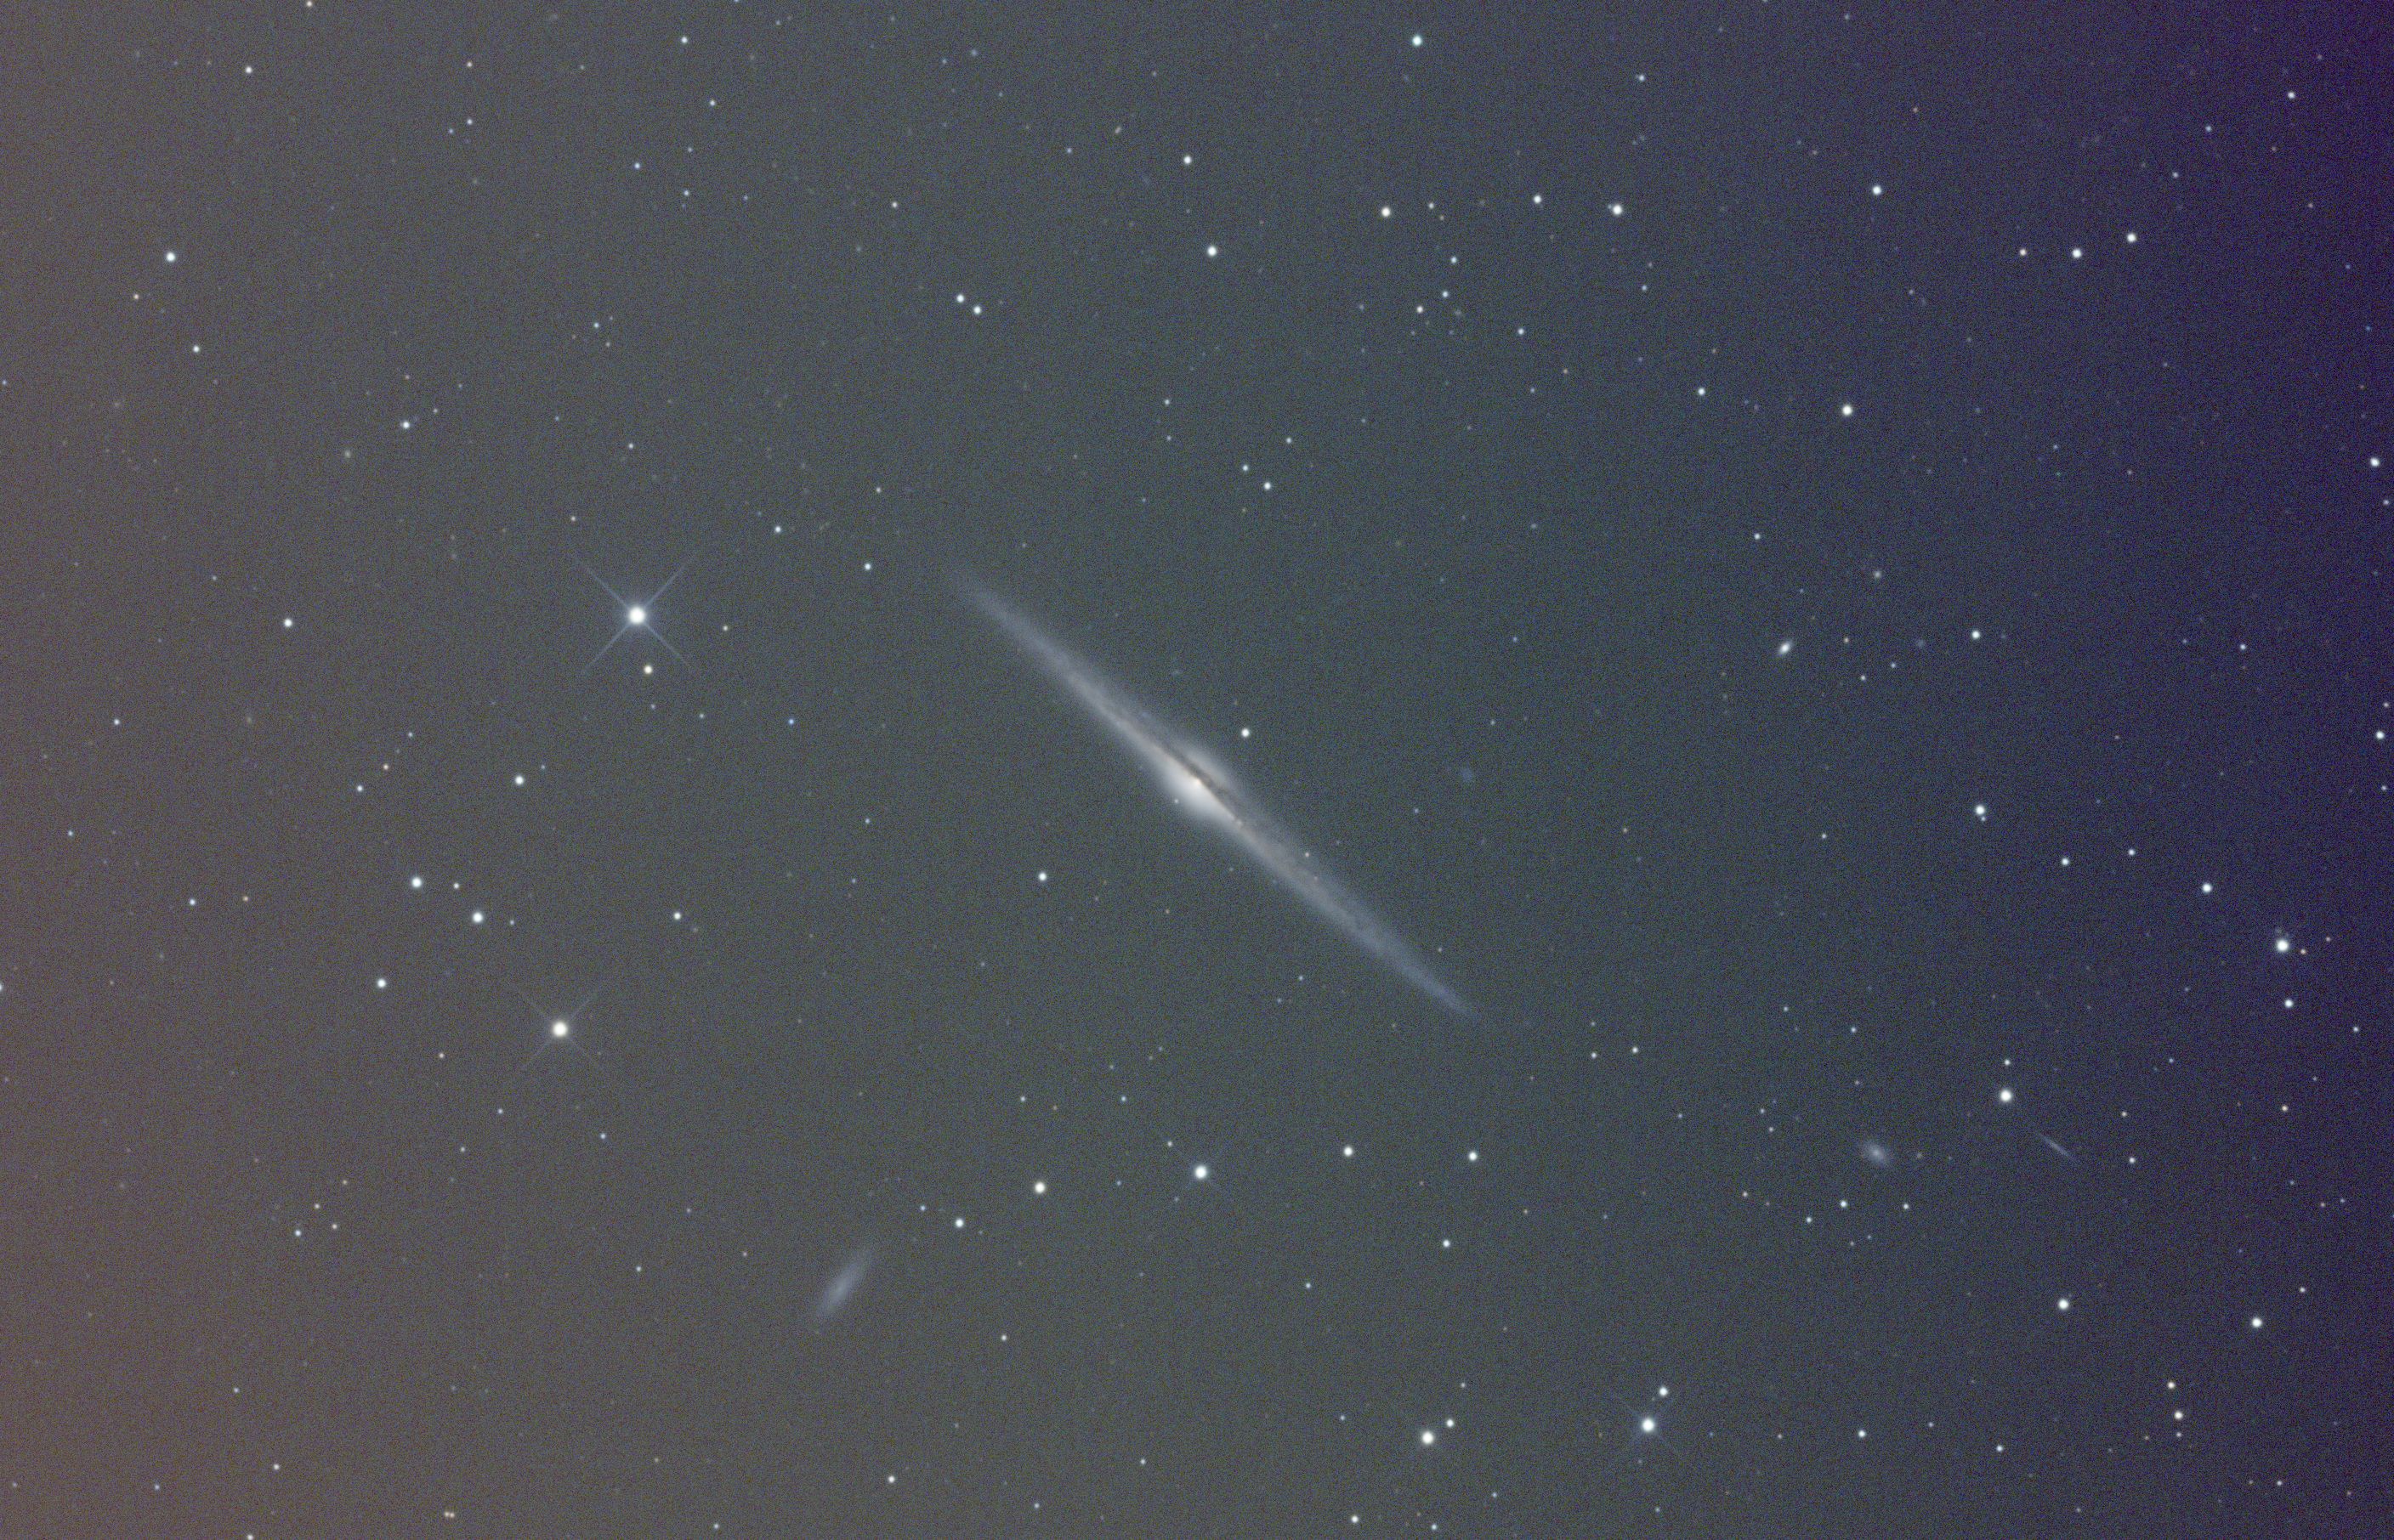
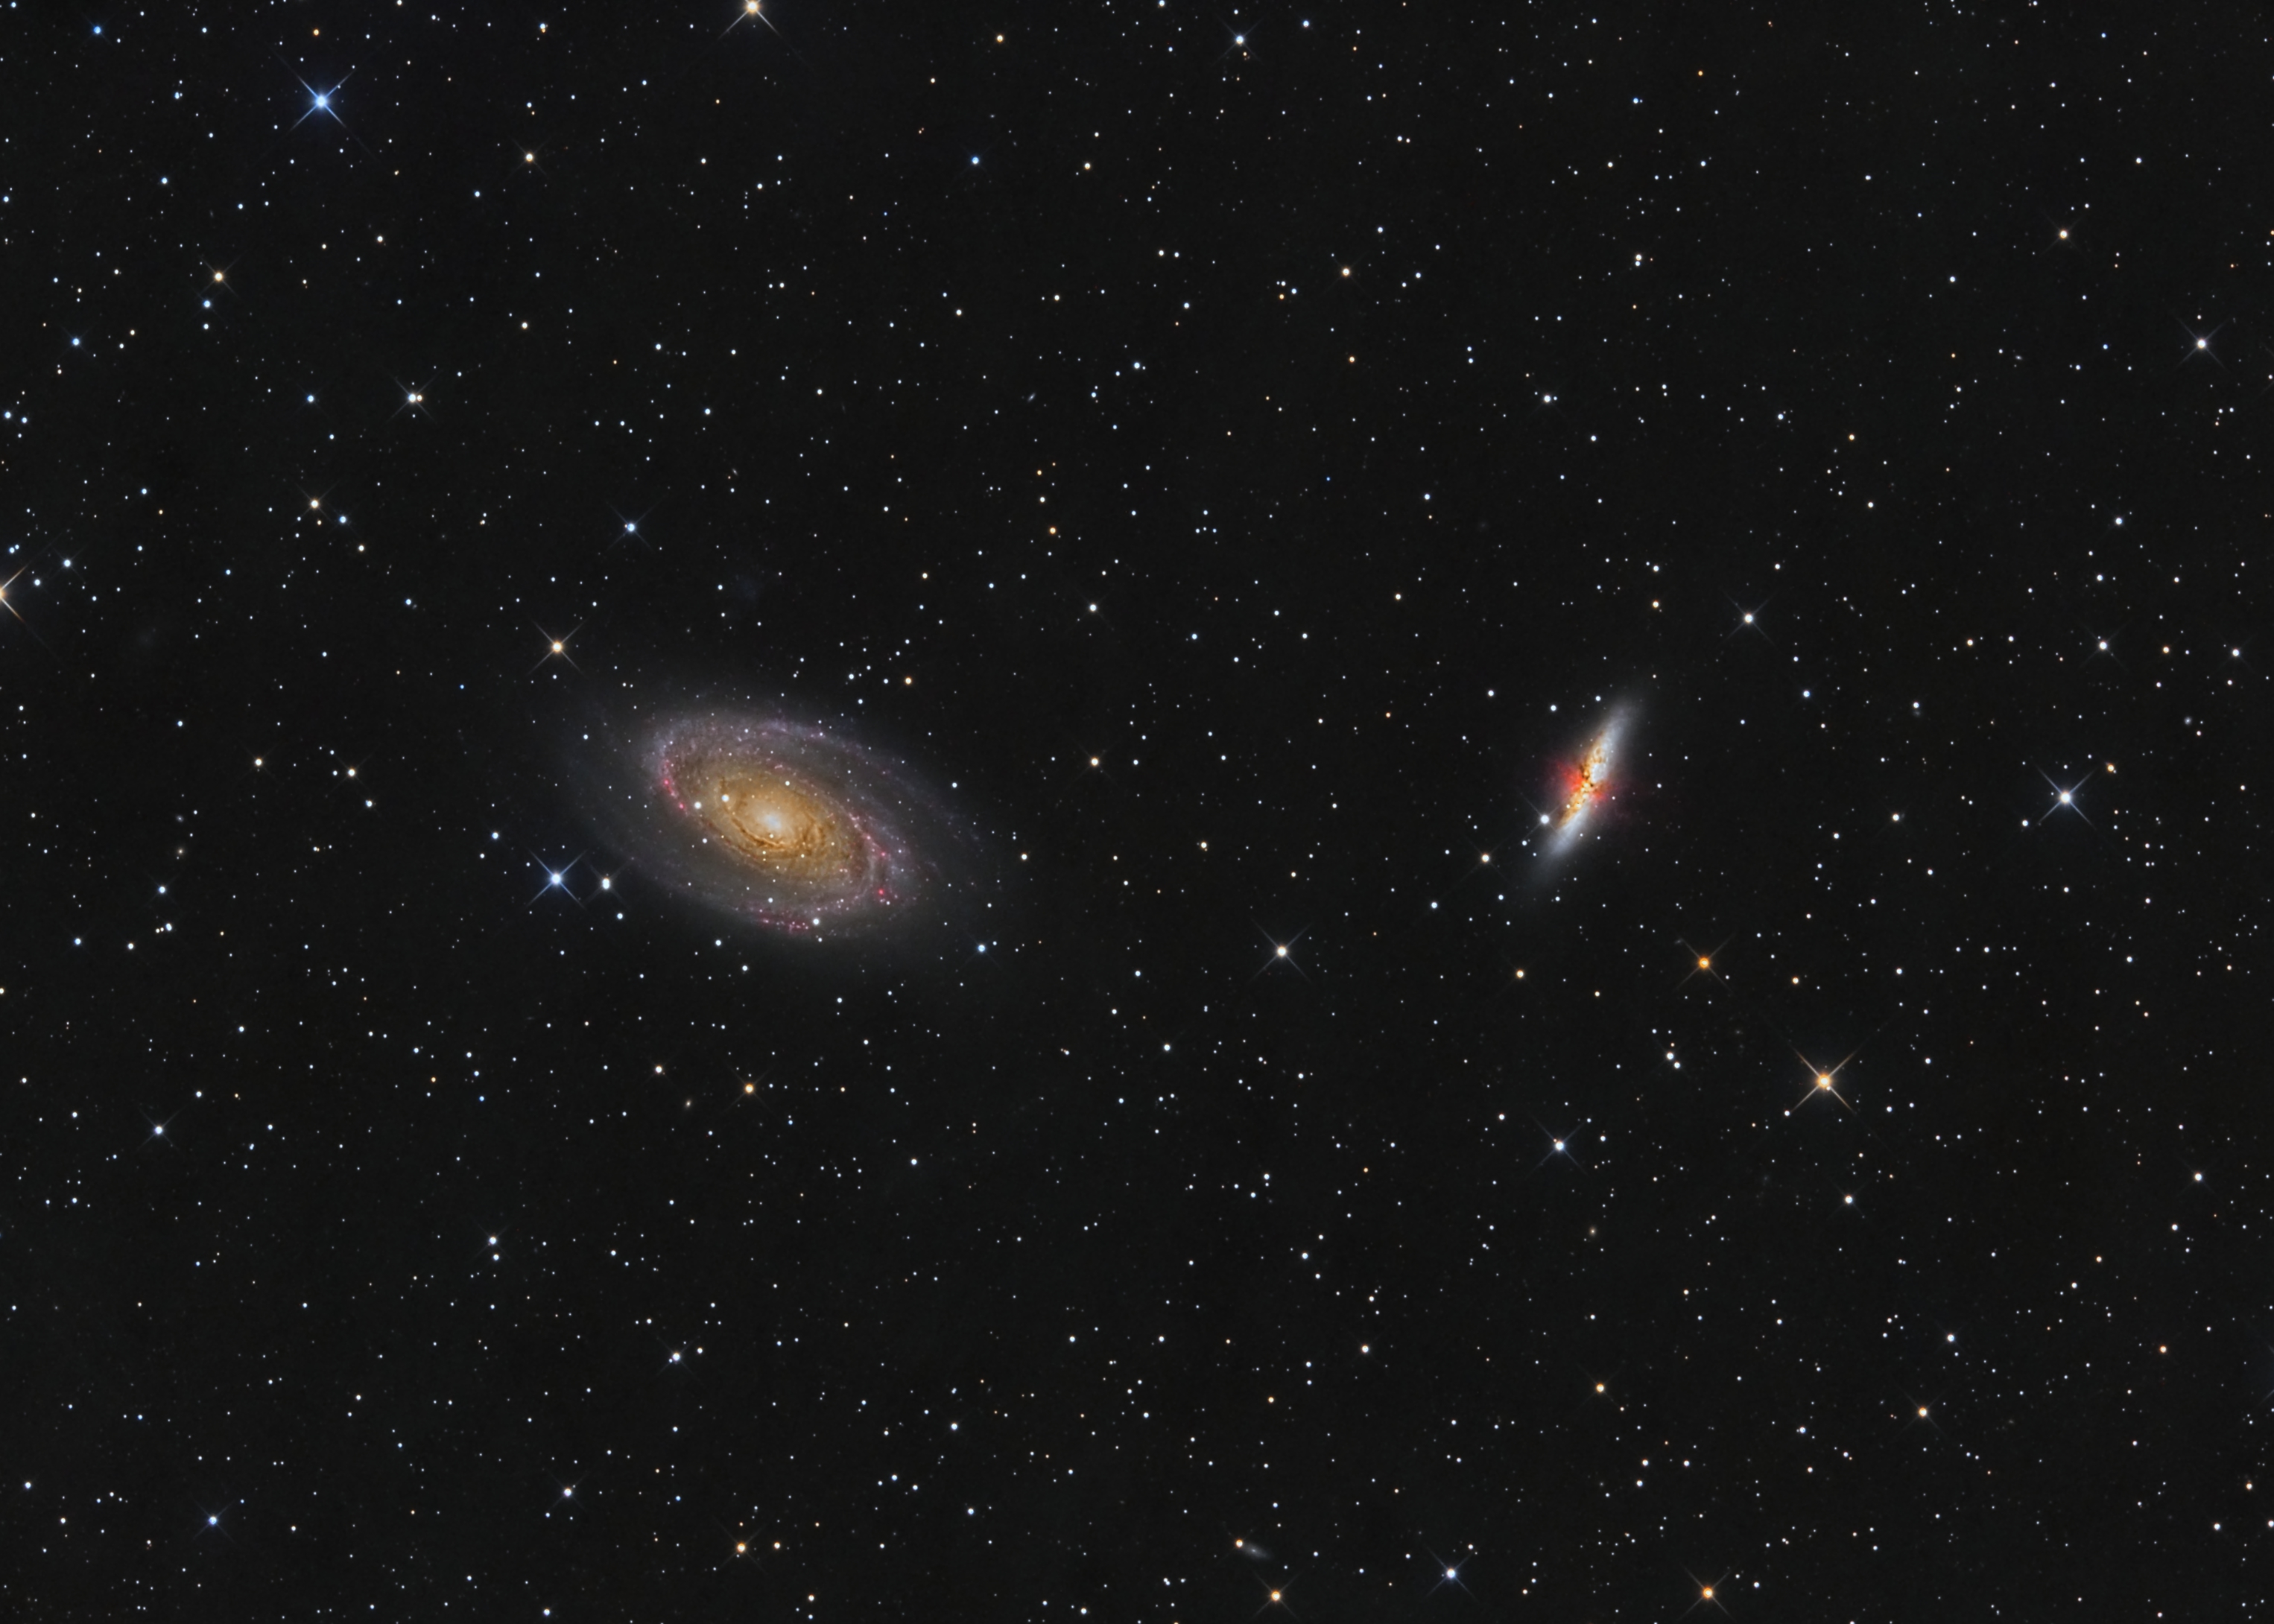
High resolution luminance data was combined with low resolution colour data to produce this stunning image. People perceive detail mostly in the brightness of an image.
17. Match Brightness of L and RGB
Before they can be combined, the histograms of the L and RGB images need to be in harmony. I extract the luminance out of the RGB image, use PI’s Linear Fit command to match it to the high-quality luminance image, and then add it back in to the colour image. This makes the colour image look terrible, but it’s now ready to get joined with the high-quality luminance data.
18. Combine L and RGB
I use the LRGB Combine process in PixInsight to combine my messed-up looking colour image from step 17 with my great looking Luminance image.
19. Make Final Tweaks
I repeat steps 14 and 16 I am done.
CONCLUSION:
A couple of hours of processing and a few hours worth of photons have become a pretty picture. At this point I am usually so excited about the image that I send it out to a few friends by email. I don’t usually distribute it further right away, because I invariably find something I want to tweak if I take at least an hour break. A final last tip – get yourself some constructive critics like my friends Shawn Nielsen, Gord Rife and Gord Simpson.
Happy processing!
Great how-to article Ron. Very in depth. A great resource for those interested in learning more about astrophotography and post-processing of these images.
Really enjoyed your presentations Saturday and Sunday at AstroCATS. Thank you!
Je vois tout de suite que vous maîtrisez bien ce que vous dites
Mr. Brecher…I enjoyed your class at the WSP at Big Pine in the Florida Keys…I am a complete novice…But your class really engaged my interest and enthusiasm…
I printed your above “Deep Sky Image Processing”….to use during my learning process..
I will visit Pixinsight for tutorials and instruction manuals..
Thank you for a fantastic class…
Willis Sutherland
Chiefland Astronomy Village…Chiefland, Florida
Thanks! I am glad you enjoyed it.
Clear skies,
Ron