Hubble Bubble
 Click for full resolution image
October 29, 2021
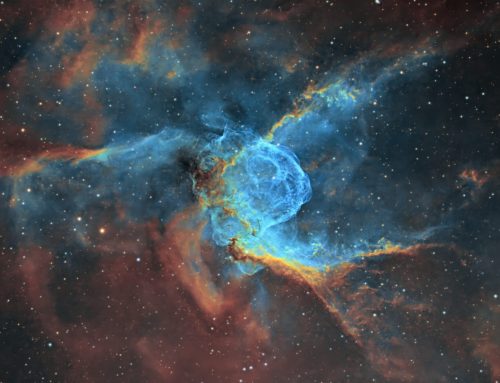
The Bubble Nebula (NGC 7635) region lies in Cassiopeia, well placed for imaging in late summer and autumn from my locale. I have imaged it many times before, but always in a natural colour palette where red dominates due to emissions from hydrogen. The image is composed in tone-mapped (i.e. false) colours made using narrowband sulfur, hydrogen and oxygen filters mapped to red, green and blue, respectively. This palette reveals some of the chemistry of this dynamic region of space and is was made famous by the Hubble Space Telescope. It’s often referred to as the “Hubble Palette.”
The Bubble Nebula is powered by the bright star inside the bubble, which is of a known as a Wolf-Rayet star. WR stars emit a lot of particles and energy, enough that they are blowing the bubble seen in this image. The central star of the bubble is between 7,000-11,000 light years away. I’ve glimpsed the brightest parts of the bubble visually through my 20″ reflector. Photographically it’s one of my favourite objects to image.
 As beautiful as the Bubble Nebula is, it is not the only deep-sky object in this image. The open cluster at lower right is M52. It appears in a small telescope like a beautiful splash of stars. Other notable objects highlighted in the annotated image at left include:
- Sh2-161 (lower left), at a similar distance to the Bubble Nebula, around 9,100 light years from us.
- Herbig-Haro 170 (near top, left of centre), is also known as MWC1080. It is a small patch of nebulosity surrounding a very young star. Herbig-Haro objects form when gas ejected by newly-formed stars collides at high speed with surrounding gas and dust.
- NGC 7538 is the mainly blue object at lower left, with slightly smaller Sh2-159 to its upper right.
- A portion of Sh2-157, the Lobster Claw Nebula is at the top left.
Tekkies:
Acquisition, focusing, and control of Paramount MX mount with N.I.N.A., TheSkyX and PHD2. Focus with Optec DirectSync motor and controller. Equipment control with PrimaLuce Labs Eagle 4 Pro computer. All pre-processing and processing in PixInsight. Acquired from my SkyShed in Guelph. Average transparency and seeing. Data acquired Oct 18-19, 2021 under a brightly moonlit sky (Moon 12 days old)..
Sky-Watcher Esprit 150 f/7 refractor and QHY600M camera with Optolong H-alpha, O(III) and S(II) 3nm filters – FIRST LIGHT WITH 3nm BANDPASS FILTERS
Ha: 9 x 20m = 3hr00m
O3: 10 x 20m = 3hr20m
S2: 9 x 20m = 3hr00m
Total: 9hr20m
Data Reduction and Cleanup
The WeightedBatchPreProcessing script was used to perform calibration, cosmetic correction, weighting, registration and integration of all frames.
Chrominance
Creation and cleanup: The S2, Ha and O3 were combined to make an RGB image. DynamicBackgroundExtraction and BackgroundNeutralization were applied to the image.
Linear Noise Reduction: MultiscaleLinearTransform was used to reduce noise in the RGB image. Layer settings for threshold and strength: Layer 1: 5.0 0.85 Layer 2: 4, 0.75 Layer 3: 3, 0.64 Layer 4: 2.0, 0.2 Layer 5: 1, 0.1.
Stretching: HistogramTransformation was applied to make a pleasing, bright image, with background set to an intensity of approximately 0.10
Luminance
Creation of Synthetic Luminance: ImageIntegration was used to make a noise-weighted average of the three narrowband masters. This was used as synthetic luminance.
Deconvolution: A star mask was made to use as a Local Deringing Support image. A copy of the image was stretched to use as a deconvolution mask. Deconvolution was applied (30 iterations, regularized Richardson-Lucy, Parametric PSF mode).
Linear Noise Reduction: MultiscaleLinearTransform was used to reduce noise in the background areas, using an internal mask to protect bright structures. Layer settings for threshold and strength: Layer 1: 4.0 0.9 Layer 2: 3.0, 0.75 Layer 3: 2.0, 0.6 Layer 4: 0.5, 0.2.
Stretching: HistogramTransformation was applied to make a pleasing, bright image, with background set to an intensity of approximately 0.10.
Combining Luminance and Chrominance
LRGB Combination: The synthetic luminance was applied to the chrominance image using LRGBCombination with default settings.
Additional Processing
Nonlinear Noise Reduction: TGVDenoise was used in L*a*b* mode to reduce noise with a mask used to mainly target the background areas and protect the stars (max. 1000 iterations and convergence selected for both luminance and chrominance).
Contrast Enhancement: LocalHistogramEqualization was applied twice using a mask to select the bright parts of the nebula and protect stars and background. The first pass was with a scale of 50 (max contrast 1.5, strength 0.25, 1 iteration), followed by a scale of 150 (max contrast 1.5, strength 0.27, 1 iteration).
Sharpening: MultiscaleMedianTransform was used to sharpen Layers 2, 3 and 4 with strengths of 0.35 and 0.17 and 0.07, respectively. A mask was used to limit sharpening to high-signal areas and to protect the stars and background regions.
Hue Adjustment: The green tones were transformed towards blue, and yellows towards red, using multiple applications of the CurvesTransformation Hue control. SCNR was applied with a strength of 0.20 through a Green mask generated with the ColorMask script.
Final Steps: Residual magenta was removed by inverting the image, applying SCNR at defualt settings, and reinverting the image. MorphologicalTransformation was applied (morphological selection=0.11; strength =0.5; 3×3 kernel) through a star mask to slightly reduce the stars. Background, nebula and star brightness, contrast, saturation and hue were adjusted in several iterations using CurvesTransformation RGB/K control with masks as required. The DarkStructureEnhance script was applied with a strength of 0.15. ICCProfileTransformation (sRGB IEC61966-2.1; Relative Colorimetric with black point compensation) was applied prior to saving as a jpg.

Looks amazing!
Gorgeous image, like always! You do such awesome 😎 work!
The color on this one captivated me. WOW, this is truly beautiful.