Veil Nebula (2022)
 Click image for full size version (LARGE FILE)
November 17, 2022
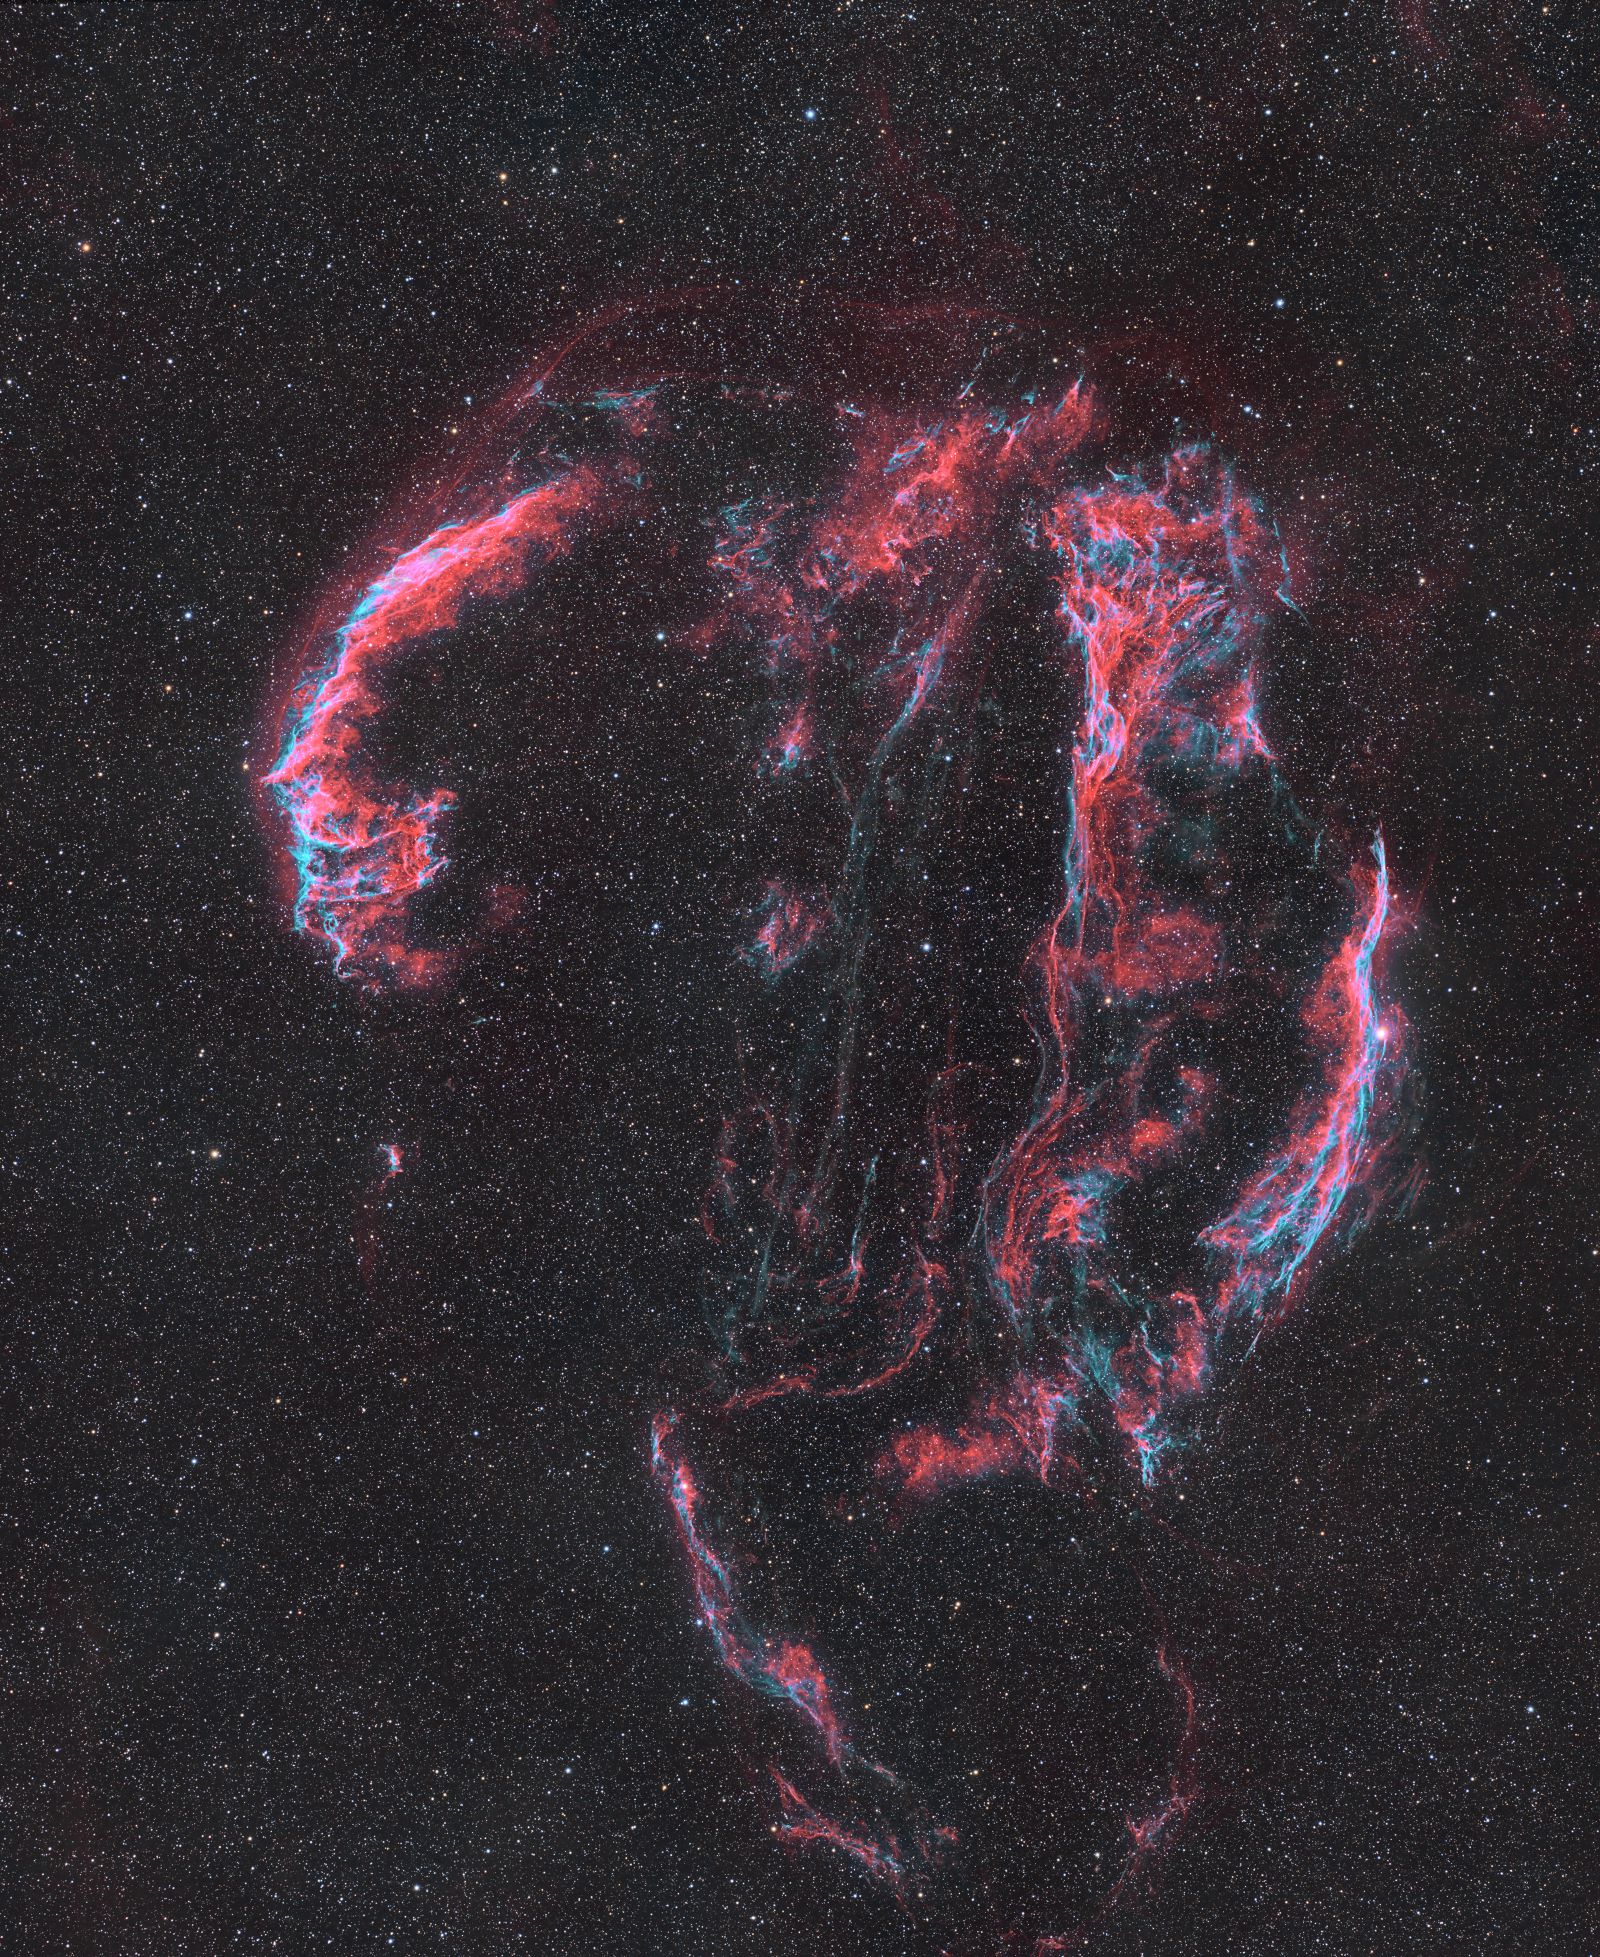
This image shows the entire Veil Nebula, a supernova remnant in Cygnus the Swan. The Veil Nebula complex is huge, covering about 7 moon widths on the sky. It is so large that it is difficult to capture the whole thing at once, so all my previous images of this region have focused on individual portions (also see annotated image from 2017):
- The Eastern Veil Nebula, NGC 6992 is to the left of the image.
- The Western Veil Nebula, NGC 6960 (“The Witch’s Broom”) is at right.
- Pickering’s Triangle is to the left of the Witch’s Broom.
- NGC 6979 lies above and to the right of the Eastern Veil Nebula.
The supernova that created the Veil Nebula happened between 5000-8000 years ago and the nebula has been expanding ever since. The glowing gas is mostly hydrogen and sulphur (red) and oxygen (teal) whose atoms are being excited by the pressure waves created by the massive explosion of the progenitor star, which was about 1,470 light years from Earth.
The brightest parts of the Veil are visible in modest amateur equipment in a dark sky, especially with an Oxygen-3 (O3) filter, which dramatically enhances contrast. It’s well placed high in the sky in late summer and autumn in the northern hemisphere. The bright star at right in the image, 52-Cygni, is visible with the naked eye and is helpful for finding the nebula. The field is crowded with stars because the nebula lies at the edge of the summer Milky Way.
Tekkies:
Acquisition, focusing, and control of Paramount MX mount with N.I.N.A., and TheSkyX. Focus with Optec DirectSync motors and controller. Equipment control with PrimaLuce Labs Eagle 4 Pro computer. All pre-processing and processing in PixInsight. Acquired from my SkyShed in Guelph. Very good transparency and average seeing. Acquired July 21-August 1, 2022, under relatively moonless skies.
Tak FSQ-106 @ f/5 (530mm), QHY-367C Pro One-shot colour with Optolong UV/IR filter and L-Ultimate filter
75 x5m UV/IR = 6hr15m per panel
The WeightedBatchPreProcessing script was used to perform calibration, cosmetic correction, weighting, registration, local normalization, integration and Drizzle integration of all frames, producing two panels per filter.
DynamicCrop and DynamicBackgroundExtraction were applied to the four masters.
Linear Processing
Mosaic Creation: StarAlignment was used in mosaic/union mode to make a mosaic template from the UV/IR masters. ImageIntegration was used to align each channel of each pane to the template. GradientMergeMosaic was used to merge Pane 1 and Pane 2 of each filter, yielding two colour masters. Edge artifacts were cropped.
Linear Noise Reduction: NoiseXterminator was used to reduce noise in the background areas with settings Amount=0.9 and Detail=0.15
Stretching: HistogramTransformation was applied to the NB-RGB image to make a pleasing, bright image.
Combining UV/IR L-Ultimate Images:
Narrowband channel preparation: The Red and Green channels were extracted from the L-Ultimate image and renamed Ha and O3, respectively.
Narrowband addition: PixelMath was used to add Ha to the red channel and O3 to the green and blue channels with the following expressions, using a mask to ensure smooth transitions.
Red: max($T, 1.2*Ha)
Green: max($T, 0.8*O3)
Blue: max($T, 0.84*O3)
Additional Processing
Star Removal: StarXterminator was used to remove stars.
Nonlinear Noise Reduction: NoiseXterminator was used to reduce noise in the background areas of each image with settings Amount=0.9 and Detail=0.25
Contrast Enhancement: LocalHistogramEqualization was applied using an inverted lightness mask to protect the background and select the galaxies. Three passes were applied (scale 40, max contrast 1.5, strength 0.18, 1 iteration; scale 80, max contrast 1.5, strength 0.22, 1 iteration; and scale 150, max contrast 1.5, strength 0.18).
Star Processing and Restoration: Curves was used to boost saturation in the stars. The stars were added back into the image using straight addition in PixelMath.
Final Steps: Background, nebula and star brightness, contrast and saturation were adjusted in several iterations using CurvesTransformation with masks as required. ICCProfileTransformation (sRGB IEC61966-2.1; Relative Colorimetric with black point compensation) was applied prior to saving as a jpg.

Hi Ron, Do you leave your equipment in an unheated area all winter? Thnaks, Dave
Great photo as well!
Beautiful image, like always!
Beautiful!
Really good!
Gorgeous image Ron. Very nice of you to publish your equipment used and how the images were processed.